
Use the Android App Messaging SDK
A tutorial for adding the Android App Messaging SDK code to your app to allow your app users to receive push notifications from your Dotdigital account
Our Android App Messaging SDK uses Firebase Cloud Messaging (FCM) to send push notifications to your Android app users. If you have not configured a Firebase project yet, follow these instructions first.
Our Android SDK is open source. You can find it on GitHub.
You can find basic sample apps on GitHub.
To embed the SDK in your native Android app, complete the following tasks:
- Install the SDK
- Prepare the push and challenge handler classes
- Initialise the SDK
- Handle push message callbacks
- Handle deep links and custom data payloads
- Optional: Change the icon or colour of your push notifications
- Start a session
This diagram shows the order in which Android and the SDK call each other, and which parts you write:
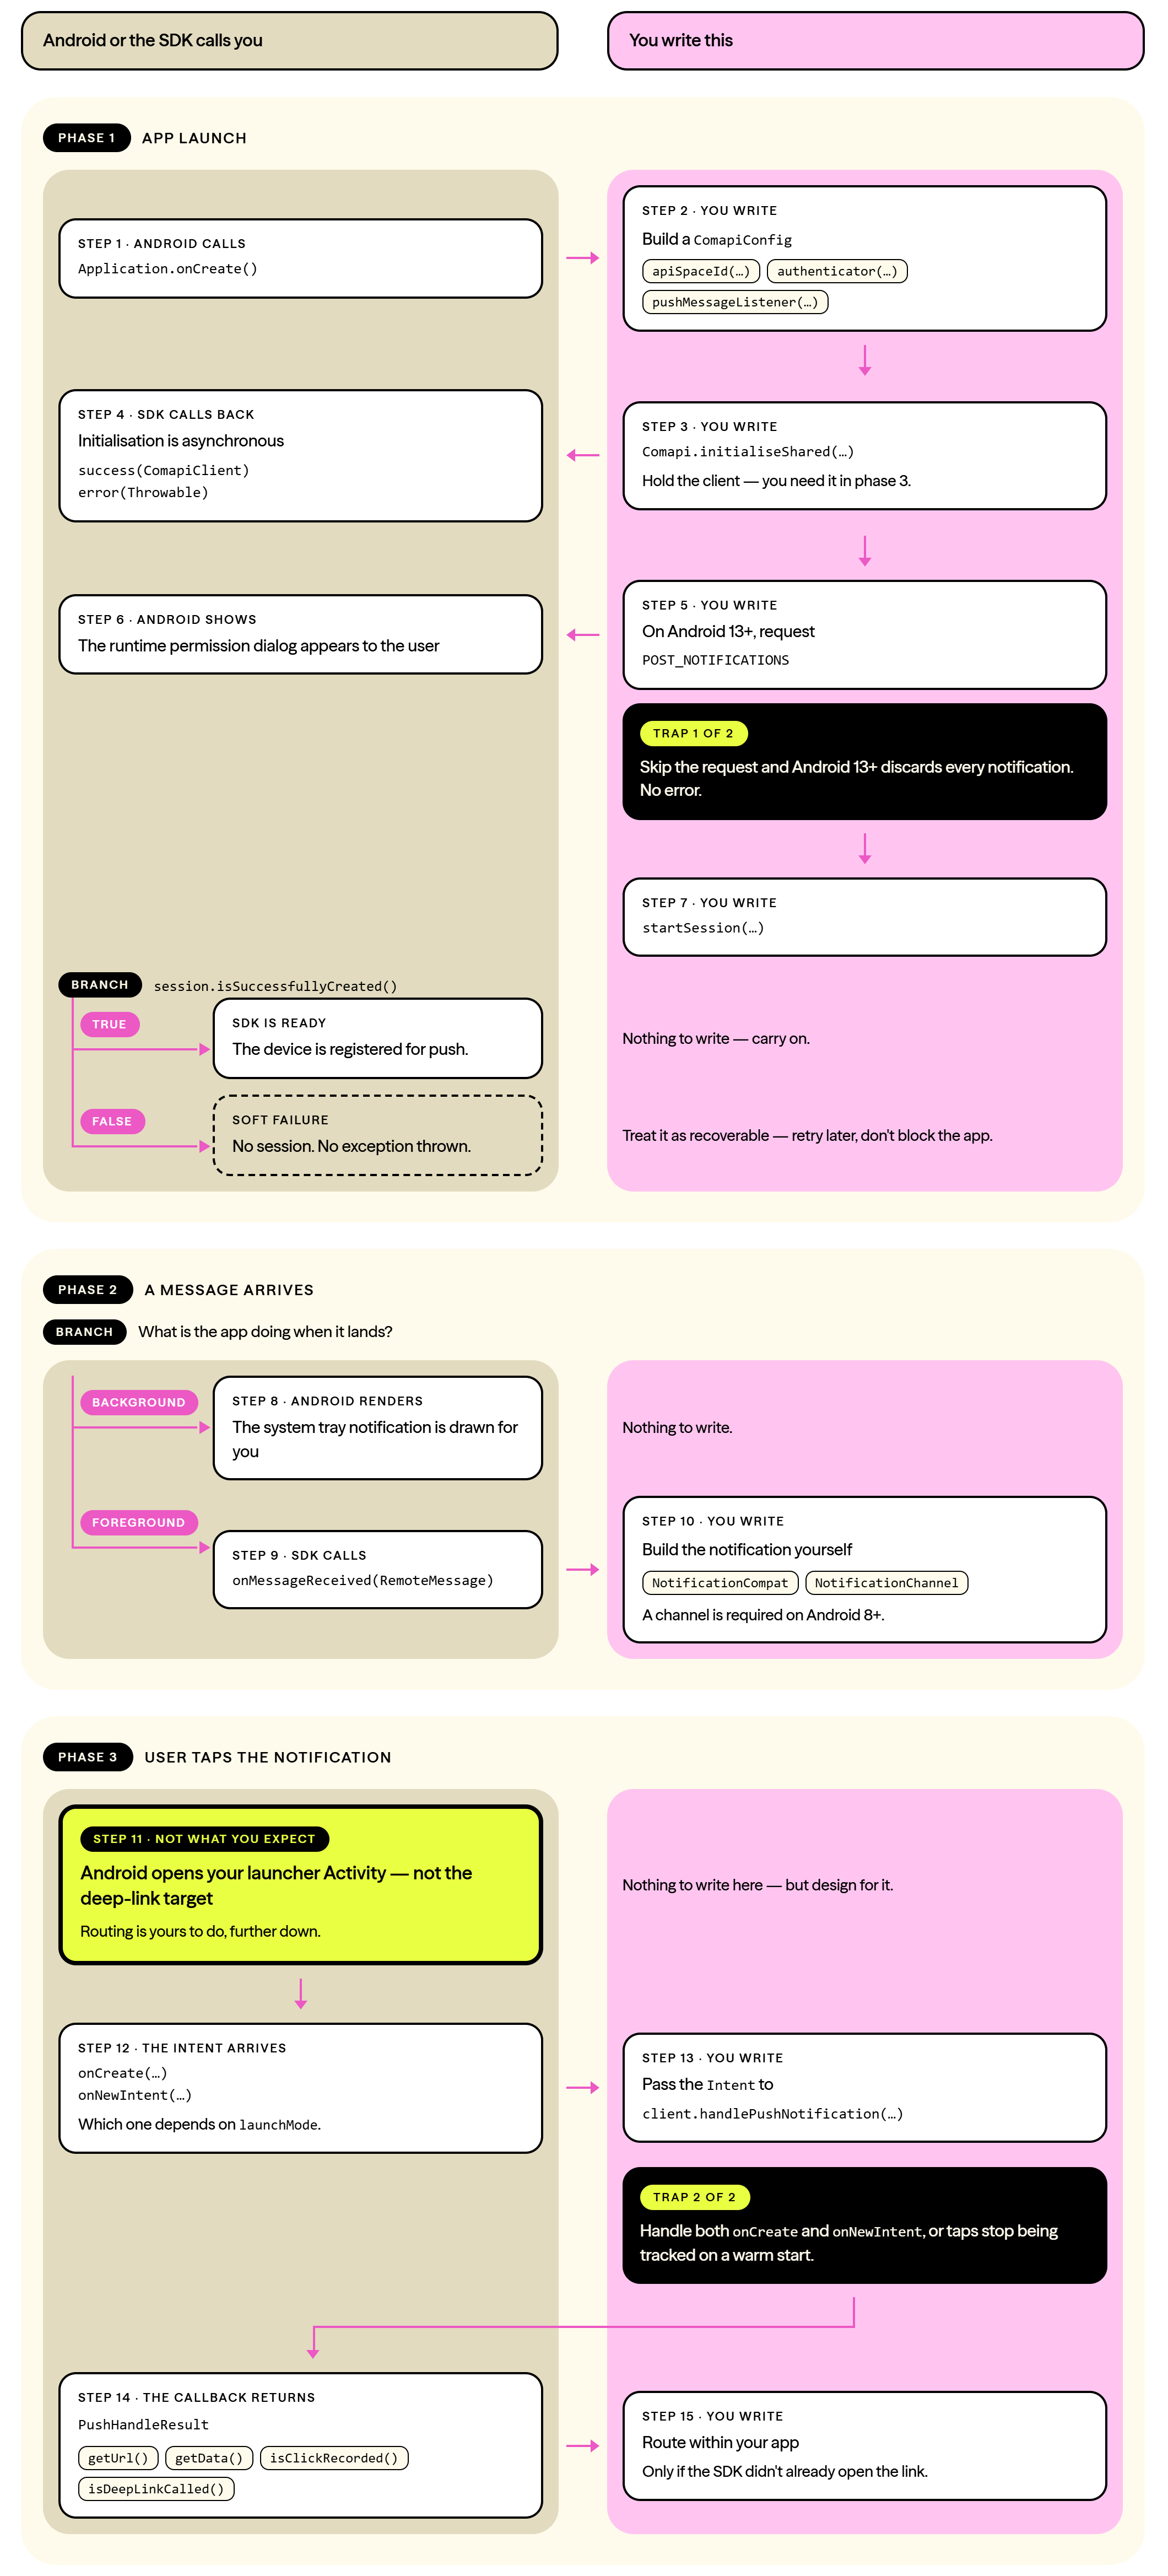
Handling asynchronous requestsYou can use standard callbacks or observable streams to handle asynchronous requests. If you use observable streams, note that the SDK uses RxJava 1 (
rx.*), not RxJava 2 or RxJava 3. Make sure that your imports match. This tutorial uses standard callbacks, and shows Kotlin coroutine equivalents where they help.
Installing the SDK
The setup spans two Gradle files and one JSON file. This diagram shows what goes where:
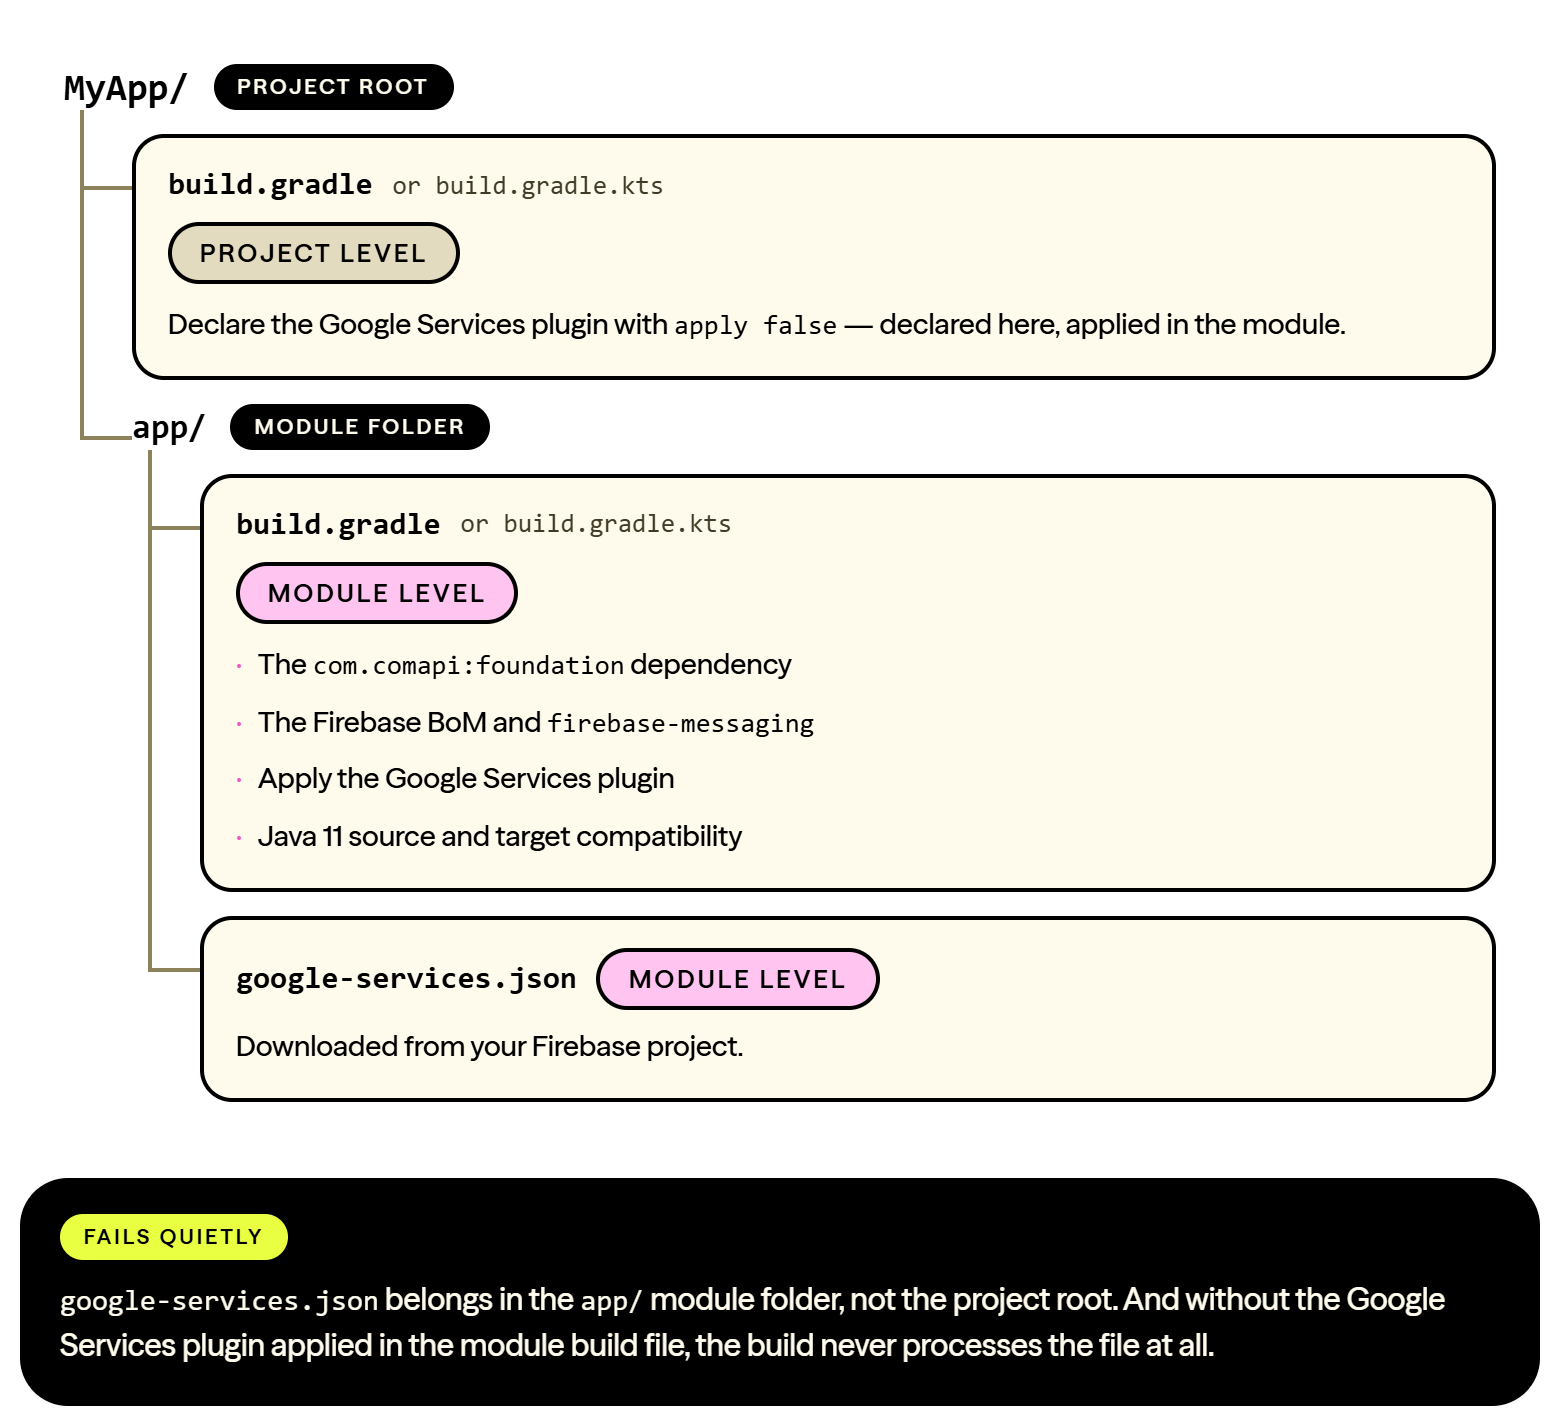
- Add the App Messaging SDK to your module-level
build.gradle(Groovy DSL) orbuild.gradle.kts(Kotlin DSL). The SDK requires Java 11. SetsourceCompatibilityandtargetCompatibilitytoJavaVersion.VERSION_11, then add thecom.comapi:foundationdependency.
android {
    compileSdk 36

    defaultConfig {
        // ...
        minSdkVersion 21
        targetSdkVersion 36
    }

    compileOptions {
        sourceCompatibility JavaVersion.VERSION_11
        targetCompatibility JavaVersion.VERSION_11
    }
}

dependencies {
    // ...
    implementation 'com.comapi:foundation:1.7.0'

    // Firebase Cloud Messaging. The SDK exposes RemoteMessage in its public API.
    implementation platform('com.google.firebase:firebase-bom:33.1.0')
    implementation 'com.google.firebase:firebase-messaging'
}
android {
compileSdk = 36
defaultConfig {
// ...
minSdk = 21
targetSdk = 36
}
compileOptions {
sourceCompatibility = JavaVersion.VERSION_11
targetCompatibility = JavaVersion.VERSION_11
}
}
dependencies {
// ...
implementation("com.comapi:foundation:1.7.0")
// Firebase Cloud Messaging. The SDK exposes RemoteMessage in its public API.
implementation(platform("com.google.firebase:firebase-bom:33.1.0"))
implementation("com.google.firebase:firebase-messaging")
}
About the Firebase BoMThe Firebase Android BoM (Bill of Materials) keeps all Firebase library versions aligned automatically. Declare one BoM version, then leave the individual Firebase artifacts unversioned. For the current BoM version, see the Firebase Android release notes.
Seeing a "Manifest merger" error?The most common cause is a
minSdkVersionin your app that is lower than the SDK supports. Set it to 21 or higher to resolve this. The SDK is built against Java 11, so your module must also use Java 11.
- Add the Google Services plugin to your project-level (top-level) build file with the Plugin DSL. Declare it here with
apply false, so that you can apply it in any module that needs it.
plugins {
    id 'com.google.gms.google-services' version '4.4.2' apply false
}
plugins {
id("com.google.gms.google-services") version "4.4.2" apply false
}- Apply the plugin in your module-level build file. This step connects
google-services.jsonto the build. If you do not apply the plugin, the build does not process the file.
plugins {
    id 'com.android.application'
    id 'com.google.gms.google-services'
}
plugins {
id("com.android.application")
id("com.google.gms.google-services")
}- Copy the
google-services.jsonfile from your Firebase project into your app module folder, which is usuallyapp/google-services.json. Do not put it in the project root.
Sync NowSynchronise your Gradle files after you make any changes. In Android Studio, select File > Sync Project with Gradle Files.
Prepare the push and challenge handler classes
Before you configure the Android SDK, you need:
- The value of the API space ID field in Dotdigital Marketing.
- A class that creates a JWT.
- A placeholder push handler class that implements the
PushMessageListenerinterface. You pass thePushHandlerclass into the SDK init method. This class receives push messages that arrive while the app is visible to the user.
import android.content.Context;

import com.comapi.internal.push.PushMessageListener;
import com.google.firebase.messaging.RemoteMessage;

public class PushHandler implements PushMessageListener {

    private final Context appContext;

    public PushHandler(Context context) {
        this.appContext = context.getApplicationContext();
    }

    @Override
    public void onMessageReceived(RemoteMessage message) {
        // TODO: Add push message handling, such as displaying messages when the app is
        // in the foreground, and handling deep links and custom data.
    }
}
import android.content.Context
import com.comapi.internal.push.PushMessageListener
import com.google.firebase.messaging.RemoteMessage
class PushHandler(context: Context) : PushMessageListener {
private val appContext = context.applicationContext
override fun onMessageReceived(message: RemoteMessage) {
// TODO: Add push message handling, such as displaying messages when the app is
// in the foreground, and handling deep links and custom data.
}
}Initialising the Android SDK
Where to initialise the Android SDKInitialise the SDK in the
onCreate()method of yourApplicationsubclass. This stops the user's profile changing each time the user opens the app. Remember to register that class in the manifest:<application android:name=".MyApplication">.
Firebase is initialised automaticallyThe Firebase Android SDK includes a
ContentProvider(com.google.firebase.provider.FirebaseInitProvider) that runs before yourApplication.onCreate().FirebaseAppis therefore ready before the Comapi SDK initialises. You do not need to callFirebaseApp.initializeApp(context)yourself, unless you use a non-defaultFirebaseOptionsconfiguration.
- Create a new instance of the
ComapiConfigclass. Pass your API space ID toapiSpaceId(...), your authentication handler toauthenticator(...), and your push handler topushMessageListener(...):
import com.comapi.ComapiConfig;

ComapiConfig config = new ComapiConfig()
    // Set the id of the API space this device belongs to.
    .apiSpaceId("<API_SPACE_ID>")
    // Handler for authentication challenges, when the SDK asks for a JWT.
    .authenticator(new ChallengeHandler())
    // Listener for pushes that arrive while the app is in the foreground.
    // Android does not render system-tray notifications in this case.
    .pushMessageListener(new PushHandler(this));
import com.comapi.ComapiConfig
val config = ComapiConfig()
.apiSpaceId("<API_SPACE_ID>")
.authenticator(ChallengeHandler())
.pushMessageListener(PushHandler(this))Configuring logs and proxy servers
LogConfig lets you set the log level for three sinks independently: file (the SDK's internal rolling log), console (Logcat), and network (HTTP request and response logging). The default level for all three is WARNING. The available levels are OFF, FATAL, ERROR, WARNING, INFO, and DEBUG.
import com.comapi.internal.log.LogConfig;
import com.comapi.internal.log.LogLevel;

LogLevel level = BuildConfig.DEBUG ? LogLevel.DEBUG : LogLevel.WARNING;

config.logConfig(
    new LogConfig()
        .setFileLevel(level)
        .setConsoleLevel(level)
        .setNetworkLevel(level)
);
import com.comapi.internal.log.LogConfig
import com.comapi.internal.log.LogLevel
val level = if (BuildConfig.DEBUG) LogLevel.DEBUG else LogLevel.WARNING
config.logConfig(
LogConfig()
.setFileLevel(level)
.setConsoleLevel(level)
.setNetworkLevel(level)
)
Privacy noteNetwork logs at
DEBUGandINFOlevel usually include request URLs, headers, and bodies. Never ship a release build at a level aboveWARNING.
Set a custom limit for the internal log file size:
config.logSizeLimitKilobytes(2048);config.logSizeLimitKilobytes(2_048)If your app connects through a proxy server, for example when you debug through Charles or mitmproxy:
import com.comapi.APIConfig;

config.apiConfiguration(new APIConfig().proxy("http://10.0.2.2:8888")); // emulator to host
import com.comapi.APIConfig
config.apiConfiguration(APIConfig().proxy("http://10.0.2.2:8888")) // emulator to host-
Pass the
ComapiConfigto one of the initialisation methods:Comapi.initialiseShared(...). The SDK stores the client as a singleton. You access it later withComapi.getShared().Comapi.initialise(...). This is the non-singleton variant. You store the client yourself, for example in your DI container.
Using Comapi.getShared() after init
Comapi.getShared()andRxComapi.getShared()return the non-null singleton after you callinitialiseShared(...). The client is created synchronously insideinitialiseShared(...), before the asynchronous network init completes. These methods throw aRuntimeExceptiononly if you call them beforeinitialiseShared(...)has run at all. If you initialise inApplication.onCreate(), it is safe to callgetShared()from any Activity, Service, or BroadcastReceiver.
package com.example.testapp;

import android.app.Application;
import com.comapi.Callback;
import com.comapi.Comapi;
import com.comapi.ComapiClient;
import com.comapi.ComapiConfig;

public class MyApplication extends Application implements Callback<ComapiClient> {

    @Override
    public void onCreate() {
        super.onCreate();

        ComapiConfig config = new ComapiConfig()
            .apiSpaceId("<API_SPACE_ID>")
            .authenticator(new ChallengeHandler())
            .pushMessageListener(new PushHandler(this));

        // Initialise the SDK asynchronously. The Application class implements
        // Callback<ComapiClient>, so the success and error methods below are called
        // when init finishes. initialiseShared makes the client available later
        // through Comapi.getShared().
        Comapi.initialiseShared(this, config, this);
    }

    @Override
    public void success(ComapiClient client) {
        // SDK initialised. The client is also available through Comapi.getShared().
    }

    @Override
    public void error(Throwable t) {
        // SDK init failed.
    }
}
package com.example.testapp
import android.app.Application
import com.comapi.Callback
import com.comapi.Comapi
import com.comapi.ComapiClient
import com.comapi.ComapiConfig
class MyApplication : Application(), Callback<ComapiClient> {
override fun onCreate() {
super.onCreate()
val config = ComapiConfig()
.apiSpaceId("<API_SPACE_ID>")
.authenticator(ChallengeHandler())
.pushMessageListener(PushHandler(this))
// Initialise the SDK asynchronously. The Application class implements
// Callback<ComapiClient>, so the success and error methods below are called
// when init finishes.
Comapi.initialiseShared(this, config, this)
}
override fun success(client: ComapiClient) {
// SDK initialised. The client is also available through Comapi.getShared().
}
override fun error(t: Throwable) {
// SDK init failed.
}
}Register your Application subclass in AndroidManifest.xml:
<application
    android:name=".MyApplication"
    ... >
    ...
</application>- Request the runtime notification permission on Android 13 and later (API 33). Use the Activity Result API instead of
requestPermissions(...). The Activity Result API is the recommended path, and it handles configuration changes correctly.
public class MainActivity extends AppCompatActivity {

    private final ActivityResultLauncher<String> requestNotificationPermission =
            registerForActivityResult(new ActivityResultContracts.RequestPermission(), granted -> {
                // granted == true means the user accepted the prompt.
            });

    @Override
    protected void onCreate(@Nullable Bundle savedInstanceState) {
        super.onCreate(savedInstanceState);
        setContentView(R.layout.activity_main);
        ensureNotificationPermission();
    }

    private void ensureNotificationPermission() {
        if (Build.VERSION.SDK_INT >= Build.VERSION_CODES.TIRAMISU
                && ContextCompat.checkSelfPermission(this, Manifest.permission.POST_NOTIFICATIONS)
                    != PackageManager.PERMISSION_GRANTED) {
            requestNotificationPermission.launch(Manifest.permission.POST_NOTIFICATIONS);
        }
    }
}
class MainActivity : AppCompatActivity() {
private val requestNotificationPermission =
registerForActivityResult(ActivityResultContracts.RequestPermission()) {
// granted == true means the user accepted the prompt.
}
override fun onCreate(savedInstanceState: Bundle?) {
super.onCreate(savedInstanceState)
setContentView(R.layout.activity_main)
ensureNotificationPermission()
}
private fun ensureNotificationPermission() {
if (Build.VERSION.SDK_INT >= Build.VERSION_CODES.TIRAMISU &&
ContextCompat.checkSelfPermission(this, Manifest.permission.POST_NOTIFICATIONS)
!= PackageManager.PERMISSION_GRANTED
) {
requestNotificationPermission.launch(Manifest.permission.POST_NOTIFICATIONS)
}
}
}The SDK manifest already declares POST_NOTIFICATIONS, so you do not need to declare it in your own manifest. On Android 13 and later, the user must also grant the permission at runtime. If the user does not grant it, the operating system drops every notification without a warning. This includes the notifications that Android renders automatically while your app is in the background.
Handle push message callbacks
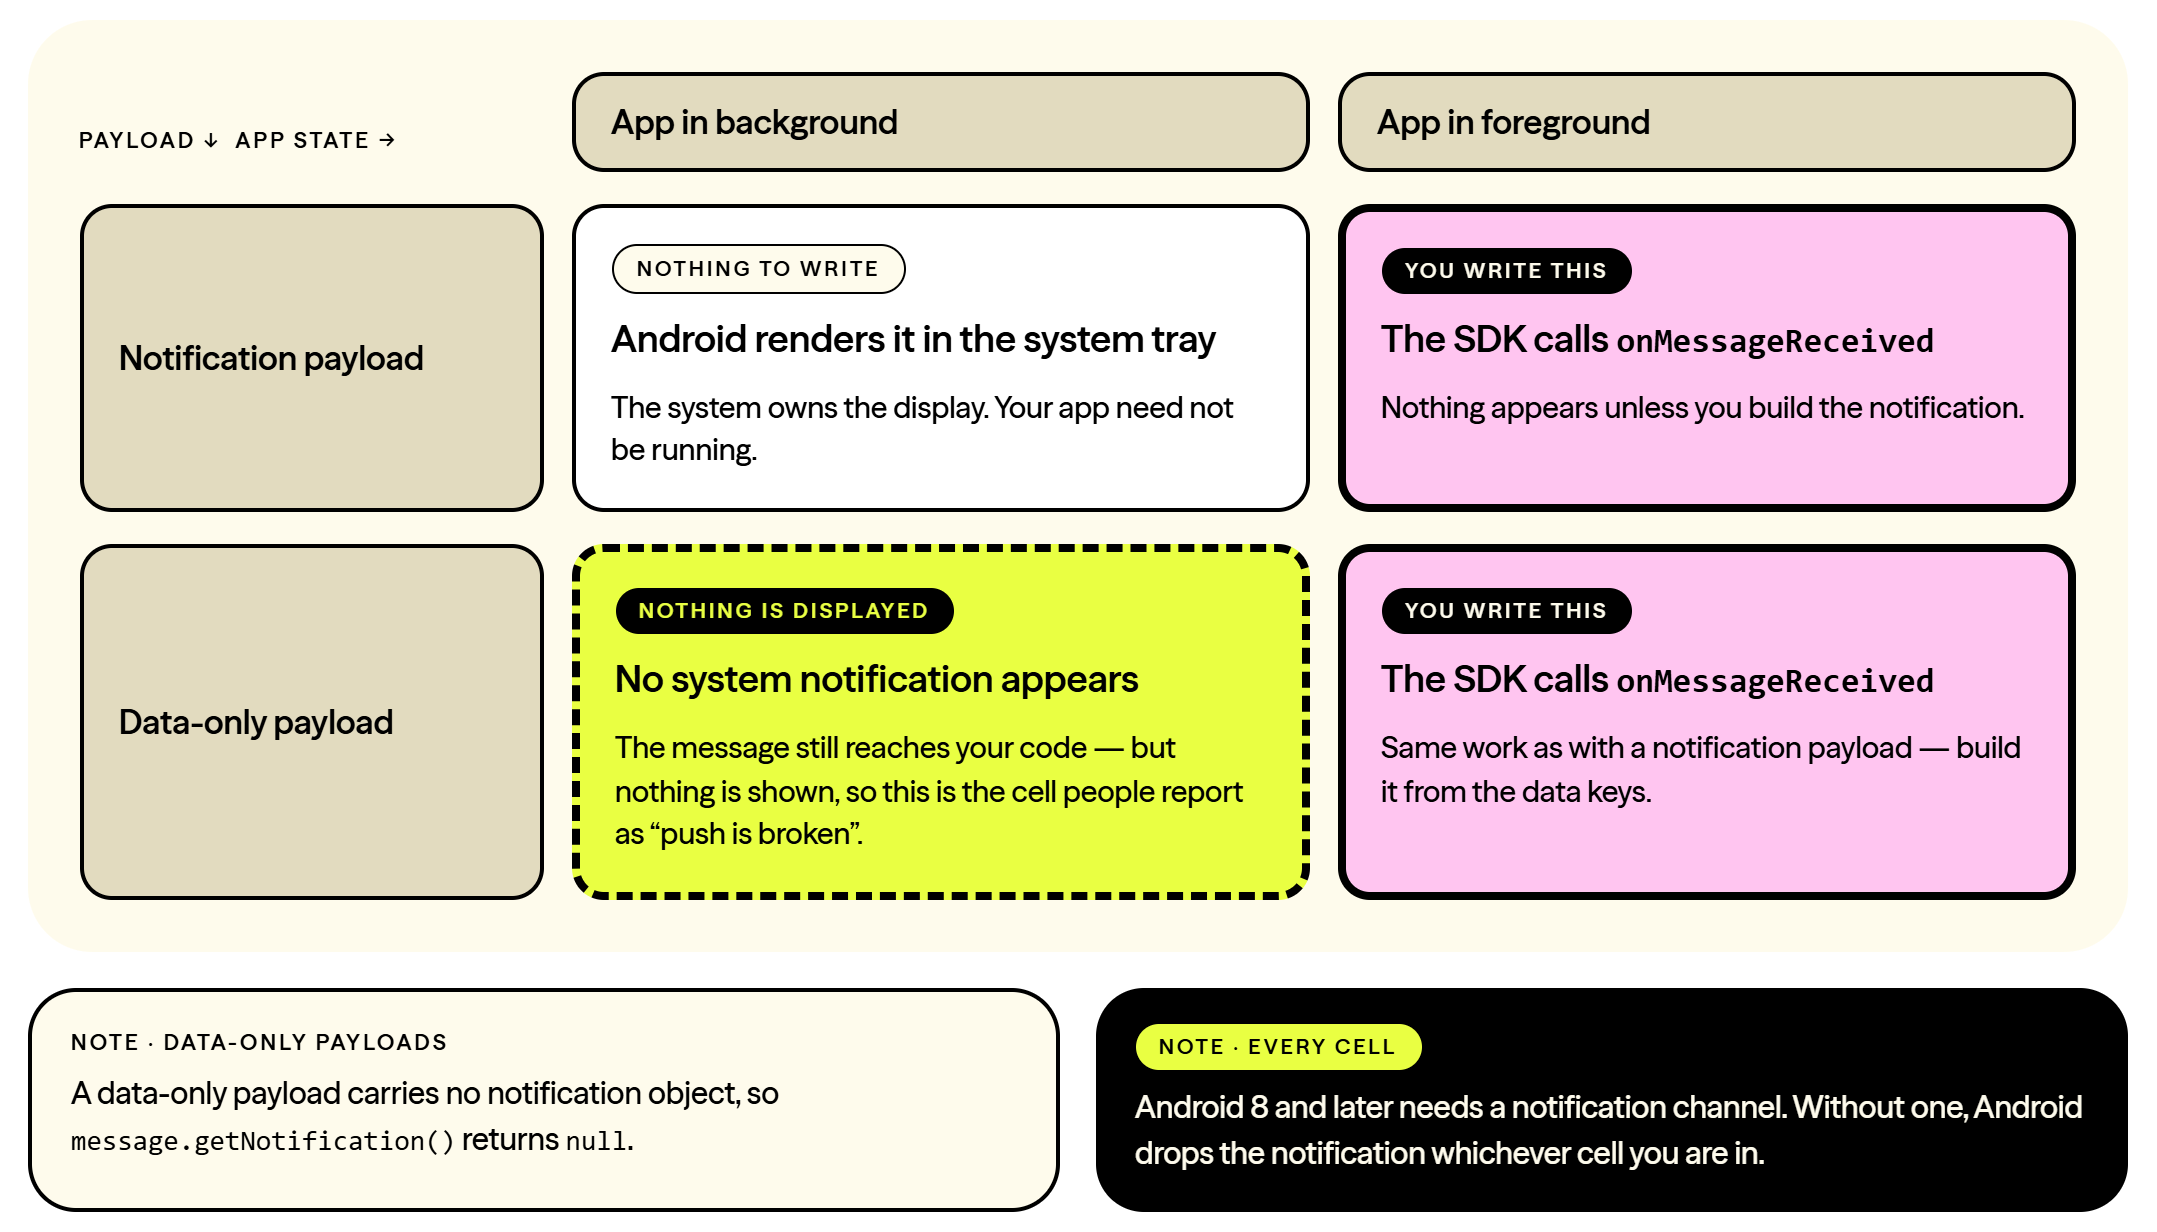
Complete the push handler class. Whether a notification appears, and who has to draw it, depends on two things: the kind of payload you send, and what your app is doing when the message lands.
Push handler callback
In your push handler class that implements PushMessageListener, decide what to do with the push message. Implement this inside onMessageReceived().
Detecting push messages from Dotdigital Marketing
Your app can receive push messages from more than one provider or system. To detect whether Dotdigital Marketing sent a push message, call parsePushMessage(). This call returns a PushDetails object. Call isDdOriginated() on that object. It returns true if Dotdigital Marketing sent the message, and false if another system sent it.
Displaying push notifications when the app is in the foreground
Android renders push notifications automatically only when the app is in the background. These notifications appear in the system tray, and they start your app when the user taps them. To display a push message while your app is in the foreground, you must do it yourself.
The example below does three things. It builds a NotificationCompat.Builder notification. It sets a back-stacked intent, so that a tap routes through your launcher Activity. It also guards the notify() call with the POST_NOTIFICATIONS permission check for Android 13 and later.
package com.example.testapp;

import android.Manifest;
import android.app.NotificationChannel;
import android.app.NotificationManager;
import android.app.PendingIntent;
import android.content.Context;
import android.content.Intent;
import android.content.pm.PackageManager;
import android.os.Build;

import androidx.core.app.ActivityCompat;
import androidx.core.app.NotificationCompat;
import androidx.core.app.NotificationManagerCompat;
import androidx.core.app.TaskStackBuilder;

import com.comapi.ComapiClient;
import com.comapi.internal.push.PushDetails;
import com.comapi.internal.push.PushMessageListener;
import com.google.firebase.messaging.RemoteMessage;

import org.json.JSONException;

public class PushHandler implements PushMessageListener {

    private static final String CHANNEL_ID = "comapi_default_channel";

    private final Context appContext;

    public PushHandler(Context context) {
        this.appContext = context.getApplicationContext();
    }

    @Override
    public void onMessageReceived(RemoteMessage message) {
        PushDetails result;
        try {
            result = ComapiClient.parsePushMessage(message);
        } catch (JSONException e) {
            e.printStackTrace();
            result = null;
        }

        // Only process push messages from Dotdigital Marketing.
        if (result != null && result.isDdOriginated()) {
            RemoteMessage.Notification notification = message.getNotification();
            if (notification == null) {
                return; // data-only payload
            }

            createNotificationChannel();

            // Unique for each notification, so that multiple pushes do not
            // overwrite each other.
            int notificationId = (int) System.currentTimeMillis();

            Intent resultIntent = new Intent(appContext, MainActivity.class);
            TaskStackBuilder stackBuilder = TaskStackBuilder.create(appContext);
            stackBuilder.addNextIntentWithParentStack(resultIntent);
            PendingIntent resultPendingIntent = stackBuilder.getPendingIntent(
                    notificationId,
                    PendingIntent.FLAG_UPDATE_CURRENT | PendingIntent.FLAG_IMMUTABLE
            );

            NotificationCompat.Builder builder = new NotificationCompat.Builder(appContext, CHANNEL_ID)
                    .setAutoCancel(true)
                    .setDefaults(NotificationCompat.DEFAULT_ALL)
                    .setWhen(System.currentTimeMillis())
                    .setSmallIcon(R.drawable.ic_notification)
                    .setContentTitle(notification.getTitle())
                    .setContentText(notification.getBody())
                    .setContentIntent(resultPendingIntent);

            if (ActivityCompat.checkSelfPermission(appContext, Manifest.permission.POST_NOTIFICATIONS)
                    == PackageManager.PERMISSION_GRANTED) {
                NotificationManagerCompat.from(appContext).notify(notificationId, builder.build());
            }
        }
    }

    private void createNotificationChannel() {
        if (Build.VERSION.SDK_INT >= Build.VERSION_CODES.O) {
            NotificationChannel channel = new NotificationChannel(
                    CHANNEL_ID,
                    "Default",
                    NotificationManager.IMPORTANCE_DEFAULT
            );
            channel.setDescription("Default push notifications");

            NotificationManager manager = appContext.getSystemService(NotificationManager.class);
            if (manager != null) {
                manager.createNotificationChannel(channel);
            }
        }
    }
}
package com.example.testapp
import android.Manifest
import android.app.NotificationChannel
import android.app.NotificationManager
import android.app.PendingIntent
import android.content.Context
import android.content.Intent
import android.content.pm.PackageManager
import android.os.Build
import androidx.core.app.ActivityCompat
import androidx.core.app.NotificationCompat
import androidx.core.app.NotificationManagerCompat
import androidx.core.app.TaskStackBuilder
import com.comapi.ComapiClient
import com.comapi.internal.push.PushMessageListener
import com.google.firebase.messaging.RemoteMessage
import org.json.JSONException
class PushHandler(context: Context) : PushMessageListener {
private val appContext = context.applicationContext
override fun onMessageReceived(message: RemoteMessage) {
val result = try {
ComapiClient.parsePushMessage(message)
} catch (e: JSONException) {
e.printStackTrace()
null
}
// Only process push messages from Dotdigital Marketing.
if (result?.isDdOriginated() == true) {
val notification = message.notification ?: return // data-only payload
createNotificationChannel()
// Unique for each notification, so that multiple pushes do not
// overwrite each other.
val notificationId = System.currentTimeMillis().toInt()
val resultIntent = Intent(appContext, MainActivity::class.java)
val stackBuilder = TaskStackBuilder.create(appContext)
stackBuilder.addNextIntentWithParentStack(resultIntent)
val resultPendingIntent: PendingIntent? = stackBuilder.getPendingIntent(
notificationId, PendingIntent.FLAG_UPDATE_CURRENT or PendingIntent.FLAG_IMMUTABLE
)
val builder = NotificationCompat.Builder(appContext, CHANNEL_ID)
.setAutoCancel(true)
.setDefaults(NotificationCompat.DEFAULT_ALL)
.setWhen(System.currentTimeMillis())
.setSmallIcon(R.drawable.ic_notification)
.setContentTitle(notification.title)
.setContentText(notification.body)
.setContentIntent(resultPendingIntent)
if (ActivityCompat.checkSelfPermission(appContext, Manifest.permission.POST_NOTIFICATIONS)
== PackageManager.PERMISSION_GRANTED
) {
NotificationManagerCompat.from(appContext).notify(notificationId, builder.build())
}
}
}
private fun createNotificationChannel() {
if (Build.VERSION.SDK_INT >= Build.VERSION_CODES.O) {
val channel = NotificationChannel(
CHANNEL_ID,
"Default",
NotificationManager.IMPORTANCE_DEFAULT
).apply { description = "Default push notifications" }
appContext.getSystemService(NotificationManager::class.java)
?.createNotificationChannel(channel)
}
}
companion object {
private const val CHANNEL_ID = "comapi_default_channel"
}
}Handling deep links
The SDK can handle deep links for you and track their usage. This is the recommended setup.
For platform guidance on deep links in Android apps, see Android App Links and Create deep links to app content.
A push message can carry a custom scheme such as myappscheme://product/123, or a web address such as https://example.com/product/123. Android opens a web address in the browser, unless your app claims that address with an Android App Link. To choose what a message sends, see Send a deep link or custom data with a push message.
To enable deep-link handling:
- Declare an intent filter on the Activity that must open when the deep link is invoked. This example uses a deep link in the form
myappscheme://mycustomhost:
<activity
    android:name=".MyActivity"
    android:exported="true">
    <intent-filter android:label="Open Activity in Dotdigital Marketing Sample App">
        <action android:name="android.intent.action.VIEW" />
        <category android:name="android.intent.category.DEFAULT" />
        <category android:name="android.intent.category.BROWSABLE" />
        <!-- Accepts URIs that begin with "myappscheme://mycustomhost" -->
        <data
            android:host="mycustomhost"
            android:scheme="myappscheme" />
    </intent-filter>
</activity>- In your launcher Activity, pass the
IntentfromonCreate(...)andonNewIntent(...)toclient.handlePushNotification(...). When the user taps a system-tray notification, the system puts Dotdigital Marketing extras on the launcher intent. The SDK reads these extras, records the click for analytics, and can also start the deep-link target.
public class MainActivity extends AppCompatActivity {

    @Override
    protected void onCreate(@Nullable Bundle savedInstanceState) {
        super.onCreate(savedInstanceState);
        setContentView(R.layout.activity_main);
        handlePush(getIntent());
    }

    // If you use android:launchMode="singleTop", the system delivers a new intent
    // here instead of recreating the Activity.
    @Override
    protected void onNewIntent(@NonNull Intent intent) {
        super.onNewIntent(intent);
        setIntent(intent);
        handlePush(intent);
    }

    private void handlePush(@NonNull Intent intent) {
        // Safe to call after Application.onCreate has run Comapi.initialiseShared(...).
        ComapiClient client = Comapi.getShared();
        client.handlePushNotification(this, intent, /* startActivity = */ true,
            new Callback<PushHandleResult>() {
                @Override public void success(PushHandleResult result) {
                    if (result == null) return;
                    String url = result.getUrl();                 // Dotdigital Marketing deep link
                    JSONObject data = result.getData();           // custom data payload
                    boolean clickRecorded = result.isClickRecorded();
                    boolean deepLinkLaunched = result.isDeepLinkCalled();
                    // Route within your app as appropriate.
                }
                @Override public void error(Throwable t) { /* ... */ }
            });
    }
}
class MainActivity : AppCompatActivity() {
override fun onCreate(savedInstanceState: Bundle?) {
super.onCreate(savedInstanceState)
setContentView(R.layout.activity_main)
handlePush(intent)
}
override fun onNewIntent(intent: Intent) {
super.onNewIntent(intent)
setIntent(intent)
handlePush(intent)
}
private fun handlePush(intent: Intent) {
// Safe to call after Application.onCreate has run Comapi.initialiseShared(...).
val client = Comapi.getShared()
client.handlePushNotification(this, intent, /* startActivity = */ true,
object : Callback<PushHandleResult> {
override fun success(result: PushHandleResult?) {
result ?: return
val url: String? = result.url // Dotdigital Marketing deep link
val data: JSONObject? = result.data // custom data payload
val clickRecorded: Boolean = result.isClickRecorded
val deepLinkLaunched: Boolean = result.isDeepLinkCalled
// Route within your app as appropriate.
}
override fun error(t: Throwable) { /* ... */ }
})
}
}
What the callback flags mean
PushHandleResult.isClickRecorded()shows that the SDK tracked the click against Dotdigital Marketing analytics.
PushHandleResult.isDeepLinkCalled()shows that the SDK started the deep-linkACTION_VIEWintent.Either flag can be
false.isDeepLinkCalled()isfalseif the payload contained no deep link, or if no Activity is registered for the scheme and host of the URL.
isClickRecorded()isfalsewhen the message carries no tracking URL. Dotdigital Marketing adds one only for the deep link and survey tap actions, so a message that sends custom data only records no tap. See Send a deep link or custom data with a push message.
Extracting a deep link without launching it
You may want to extract the deep-link URL yourself instead of letting the SDK start it. To do this, use the static ComapiClient.parsePushMessage(...) helper. This method throws a JSONException if the payload is malformed.
@Override
public void onMessageReceived(RemoteMessage message) {
    try {
        PushDetails details = ComapiClient.parsePushMessage(message);
        Log.i("Comapi", "url = " + details.getUrl());
    } catch (JSONException e) {
        Log.w("Comapi", "Failed to parse push payload", e);
    }
}
override fun onMessageReceived(message: RemoteMessage) {
try {
val details = ComapiClient.parsePushMessage(message)
Log.i("Comapi", "url = ${details.url}")
} catch (e: JSONException) {
Log.w("Comapi", "Failed to parse push payload", e)
}
}Handling custom data payloads
parsePushMessage(...) also returns the Dotdigital Marketing custom data field. To read it, call getData() on the returned PushDetails object:
@Override
public void onMessageReceived(RemoteMessage message) {
    try {
        PushDetails details = ComapiClient.parsePushMessage(message);
        JSONObject data = details.getData();
        Log.i("Comapi", "data = " + (data != null ? data.toString() : "null"));
    } catch (JSONException e) {
        Log.w("Comapi", "Failed to parse push payload", e);
    }
}
override fun onMessageReceived(message: RemoteMessage) {
try {
val details = ComapiClient.parsePushMessage(message)
Log.i("Comapi", "data = ${details.data?.toString() ?: "null"}")
} catch (e: JSONException) {
Log.w("Comapi", "Failed to parse push payload", e)
}
}
The values arrive as JSON stringsAn FCM data payload can hold only text values, so Dotdigital Marketing converts the
dd_dataanddd_deepLinkobjects to JSON strings before it sends them.
ComapiClient.parsePushMessage()converts them back for you, and returnsgetData()as aJSONObject. If you readRemoteMessage.getData()directly instead, you get the raw JSON string and must parse it yourself.
Validate the custom dataYour app decides what the data means, so treat every value as untrusted input. Check that each key exists and has the type you expect before you use it. A malformed or unexpected payload must not crash your app.
parsePushMessage()throws aJSONExceptionwhen the payload is malformed, so always catch it.
To find out how to send custom data, and what you can put in it, see Send a deep link or custom data with a push message.
Handling silent pushes
A silent push delivers data to your app without notifying the user. Use it to start an action in the background, for example to refresh cached content.
Dotdigital Marketing sends a silent push as a data-only payload, with no notification object. Android therefore displays nothing, and message.getNotification() returns null. The SDK still calls onMessageReceived, so your app receives the data and decides what to do with it.
The foreground notification example above returns early when getNotification() is null. To act on a silent push, read the custom data instead of returning:
@Override
public void onMessageReceived(RemoteMessage message) {
    try {
        PushDetails details = ComapiClient.parsePushMessage(message);
        if (!details.isDdOriginated()) {
            return;
        }

        if (message.getNotification() == null) {
            // Silent push. Act on the data without showing a notification.
            JSONObject data = details.getData();
            // Refresh content, update state, or start your own work here.
            return;
        }

        // Notification payload. Build and show the notification.
    } catch (JSONException e) {
        Log.w("Comapi", "Failed to parse push payload", e);
    }
}
override fun onMessageReceived(message: RemoteMessage) {
try {
val details = ComapiClient.parsePushMessage(message)
if (details?.isDdOriginated() != true) {
return
}
if (message.notification == null) {
// Silent push. Act on the data without showing a notification.
val data = details.data
// Refresh content, update state, or start your own work here.
return
}
// Notification payload. Build and show the notification.
} catch (e: JSONException) {
Log.w("Comapi", "Failed to parse push payload", e)
}
}
Android does not guarantee silent push deliveryAndroid restricts background work in Doze mode and when the device is idle, so the system may delay a silent push or not deliver it. Manufacturers including Xiaomi, Huawei, Oppo, and Samsung apply further restrictions. Do not rely on a silent push for anything critical.
To find out how to send a silent push, see Send a silent push message.
Changing the icon or colour of push notifications
The Android SDK uses Firebase Cloud Messaging (FCM) to deliver push notifications. Use the Android <meta-data> element in your AndroidManifest.xml to set the default icon and accent colour. Android uses these defaults when the server payload does not specify an icon or a colour.
<!-- Default icon for incoming notification messages, used when the payload
     does not supply one. -->
<meta-data
    android:name="com.google.firebase.messaging.default_notification_icon"
    android:resource="@mipmap/ic_launcher_round" />

<!-- Default accent colour for incoming notification messages. -->
<meta-data
    android:name="com.google.firebase.messaging.default_notification_color"
    android:resource="@color/colorAccent" />
Sessions
Starting a session
The SDK requires an active session to receive push messages and to register push tokens.
To create a session, you need two things. You need a client that initialised successfully. You also need an identifier for the sub claim of the JWT. This is usually the ID of the signed-in user, or a stable device-scoped GUID for anonymous users.
client.service().session().startSession(new Callback<Session>() {
    @Override public void success(Session session) {
        if (session.isSuccessfullyCreated()) {
            // Session is ready for profile session.getProfileId()
        }
    }
    @Override public void error(Throwable t) { /* ... */ }
});
client.service().session().startSession(object : Callback<Session> {
override fun success(session: Session) {
if (session.isSuccessfullyCreated) {
// Session is ready for profile ${session.profileId}
}
}
override fun error(t: Throwable) { /* ... */ }
})// Obtain the reactive client. Use RxComapi.getShared() if you initialised
// with Comapi.initialiseShared(...).
RxComapiClient rxClient = RxComapi.getShared();
rxClient.service().session().startSession()
.subscribe(new Observer<Session>() { /* implement */ });// Obtain the reactive client. Use RxComapi.getShared() if you initialised
// with Comapi.initialiseShared(...).
val rxClient = RxComapi.getShared()
rxClient.service().session().startSession()
.subscribe(object : Observer<Session> { /* implement */ })Treat isSuccessfullyCreated() == false as a soft failure. The success path can run even when the server returns an incomplete session. Always check this flag before you treat the SDK as authenticated.
Ending a session
End the current session only when the user signs out, or when you want to change users on the same device.
client.service().session().endSession(new Callback<ComapiResult<Void>>() { /* implement */ });client.service().session().endSession(object : Callback<ComapiResult<Void>> { /* implement */ })rxClient.service().session().endSession()
.subscribe(new Observer<ComapiResult<Void>>() { /* implement */ });rxClient.service().session().endSession()
.subscribe(object : Observer<ComapiResult<Void>> { /* implement */ })
Only users that have both an email address and a push token are created in Dotdigital MarketingRead the Register your app users for push page to understand the requirements for syncing your app users with Dotdigital Marketing. Dotdigital Marketing syncs only the users who have both an email address and a push token. Only these users can receive push messages.
Next stepsMake sure that your app passes an email address to the SDK for the app user. Dotdigital Marketing then creates a contact for that user. To do this, follow these instructions.
When your app can receive push messages, decide what each message does. See Send a deep link or custom data with a push message.
Updated 27 days ago