
Use the iOS SDK
A tutorial for adding the iOS SDK code to your app to allow your app users to receive push notifications from your Dotdigital account.
Our iOS SDK lets your app users receive push notifications from your Dotdigital Marketing account. Dotdigital Marketing collects your users' email addresses, then uses them to identify each user so that you can send push notifications.
Our iOS SDK uses the Apple Push Notification service (APNS) to send push notifications to your contacts.
Our iOS SDK is open source. Use the repository that matches your dependency manager:
Sample apps are available for both languages:
To set up push notifications for native iOS apps, complete the following tasks:
- Register your app for APNS use
- Install the iOS SDK
- Set up the APNS environment
- Set up authentication
- Configure the iOS SDK
- Initialise the SDK and retrieve the client
- Start a session
- Ask permission and register the push token
- Handle push notifications
- Handle deep links and custom data payloads
- Optional: Handle silent pushes
Install the iOS SDK
The SDK library is called CMPComapiFoundation. Install it with Swift Package Manager or with CocoaPods.
Swift Package Manager (SPM)
- Open your project in Xcode.
- Select File > Add Package Dependencies... from the menu bar.
- Paste the repository URL
https://github.com/comapi/comapi-sdk-ios-objc-spminto the search bar at the top right. - Set your preferred Dependency Rule, for example Up to Next Major Version.
- Select Add Package.
- Select
CMPComapiFoundation, assign it to your app target, then select Add Package again.
CocoaPods
- Add the iOS SDK to your
Podfile:
# other podfile info

target 'Your-Target' do
  use_frameworks!

  pod 'CMPComapiFoundation'
end- Install the iOS SDK:
pod install- Import the iOS SDK in your Objective-C or Swift file:
#import <CMPComapiFoundation/CMPComapiFoundation.h>import CMPComapiFoundationSet up the APNS environment
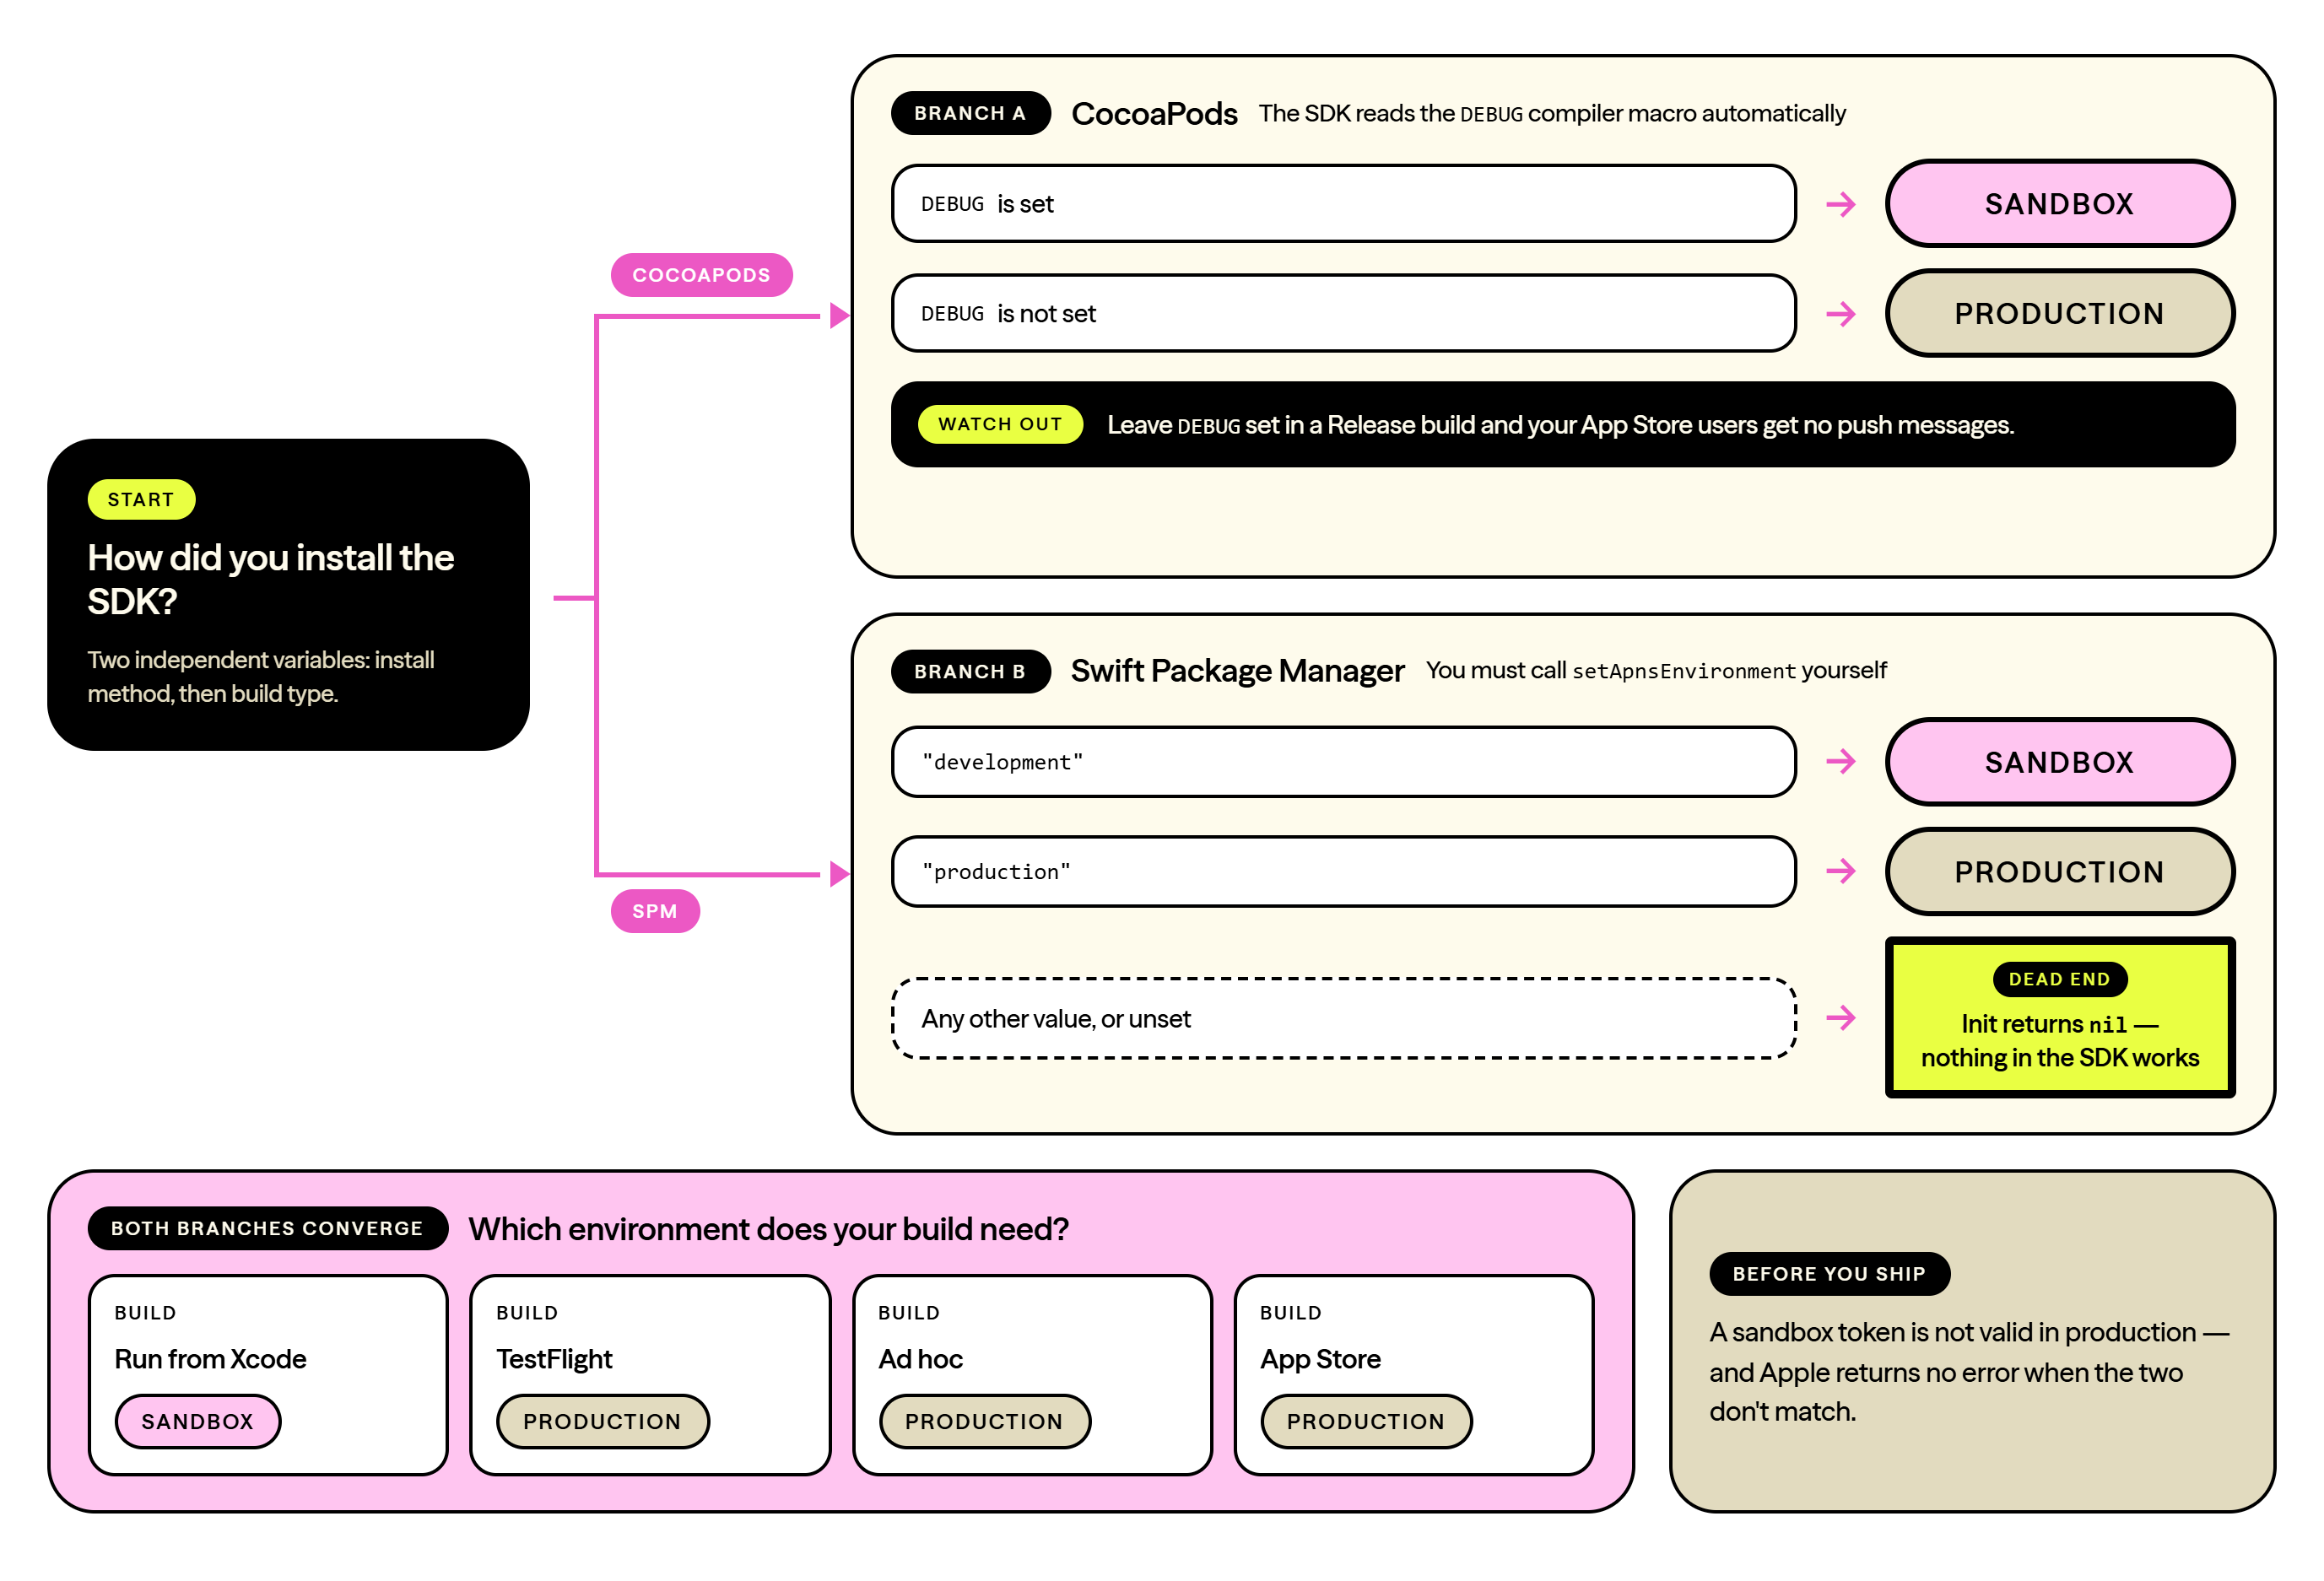
Apple operates two separate APNS environments: sandbox and production. Your app build must use the correct one. The SDK detects which environment to use, but the detection method depends on how you installed the SDK.
This diagram shows how to find the correct setting for your build:
| Build type | APNS environment |
|---|---|
| Development builds run from Xcode | Sandbox |
| TestFlight builds | Production |
| Ad hoc distribution builds | Production |
| App Store builds | Production |
If you set the APNS environment incorrectly, your app receives no push messagesA token from the sandbox environment is not valid in the production environment, and a production token is not valid in the sandbox environment. Apple returns no error when the environments do not match. The push message is dropped without a warning.
Requirements for all builds
These requirements apply to every build type:
- Add the Push Notifications capability to your app target in Xcode. Select your target, go to Signing & Capabilities, then select + Capability and add Push Notifications. Xcode then manages the
aps-environmententitlement for you, and sets the correct value for each build type. - Make sure that your provisioning profile includes the Push Notifications entitlement.
- Make sure that you have uploaded the correct p8 private key to Dotdigital Marketing, and that you have supplied the correct bundle identifier, Apple team ID, and private key ID. See Create a push notification profile.
About the aps-environment entitlementXcode sets the
aps-environmententitlement automatically when you add the Push Notifications capability. You do not normally need to edit it by hand. The values aredevelopmentfor development builds andproductionfor all other build types.If you need to inspect the entitlement, it looks like this:
<?xml version="1.0" encoding="UTF-8"?>
<!DOCTYPE plist PUBLIC "-//Apple//DTD PLIST 1.0//EN" "http://www.apple.com/DTDs/PropertyList-1.0.dtd">
<plist version="1.0">
<dict>
    <key>aps-environment</key>
    <string>development</string>
</dict>
</plist>
If you installed the SDK with CocoaPods
The CocoaPods version of the SDK reads the DEBUG compiler macro to detect the environment. If DEBUG is set, the SDK uses the APNS sandbox. If DEBUG is not set, the SDK uses APNS production.
For Objective-C projects:
- Open your project Build Settings and search for Preprocessor Macros.
- Add
DEBUG=1to the Debug configuration. - Add
DEBUG=0to the Release configuration.
For Swift projects:
- Open your project Build Settings and search for Other Swift Flags, under Swift Compiler - Custom Flags.
- Add
-DDEBUGto the Debug configuration. - Leave the Release configuration empty, or make sure that it does not contain
-DDEBUG.
Check your Release configuration before you shipIf
DEBUGis set in a Release build, the SDK registers with the APNS sandbox instead of APNS production. Your App Store and TestFlight users then receive no push messages.
If you installed the SDK with Swift Package Manager
The SPM version of the SDK does not read the DEBUG macro. You must set the environment explicitly in CMPComapiConfig. The only accepted values are development and production.
The SDK fails to initialise if you do not set the APNS environmentIn the SPM version, initialisation returns
nilifapnsEnvironmentis not set to exactlydevelopmentorproduction. The SDK also writes an error to the log. You get no client object at all, so nothing else on this page works until you set this value.
// Use "development" for builds you run from Xcode.
// Use "production" for TestFlight, ad hoc, and App Store builds.
let config = ComapiConfig()
    .setApnsEnvironment("production")
To set the value automatically for each build type, use the DEBUG compiler flag:
#if DEBUG
let apnsEnvironment = "development"
#else
let apnsEnvironment = "production"
#endif

let config = ComapiConfig()
    .setApnsEnvironment(apnsEnvironment)
Set up authentication
Before you configure the SDK, you need:
- A push notification profile in your Dotdigital Marketing account.
- An authentication provider that can generate a JWT (JSON Web Token) that matches the authentication scheme in your push notification profile.
The SDK asks your app for a JWT when it needs to start a session. To answer this request, your config's authenticationDelegate object must conform to the authentication delegate protocol and implement the challenge method.
// These values come from the Authentication section of your push notification
// profile in Dotdigital Marketing.
NSString *idClaim = <ID claim value>;
NSString *issuer = <Issuer value>;
NSString *audience = <Audience value>;
NSString *secret = <Shared secret value>;

- (void)client:(CMPComapiClient *)client didReceiveAuthenticationChallenge:(CMPAuthenticationChallenge *)challenge completion:(void (^)(NSString * _Nullable))continueWithToken {
    // Request a JWT from your provider, which should be your backend server.
    [YourProviderServer getTokenForNonce:challenge.nonce
                                     id:idClaim
                                 issuer:issuer
                               audience:audience
                                 secret:secret
                             completion:^(NSString *token, NSError *error) {
        // Call the continueWithToken block with the generated token.
        if (token && !error) {
            continueWithToken(token);
        } else {
            // Pass nil so that the SDK does not wait for a token that never arrives.
            continueWithToken(nil);
        }
    }];
}
extension LoginViewModel: AuthenticationDelegate {
func client(_ client: ComapiClient,
didReceive challenge: AuthenticationChallenge,
completion continueWithToken: @escaping (String?) -> Void) {
// Request a JWT from your provider, which should be your backend server.
YourProviderServer.token(forNonce: challenge.nonce) { token in
// Pass nil if the request fails, so that the SDK does not wait for a
// token that never arrives.
continueWithToken(token)
}
}
}
Generate the JWT on your backend serverDo not hard code your shared secret in the app, and do not sign JWTs on the device. Request the token from your backend server with an HTTP call.
For the JWT claims that you must include, and for token generator samples in Objective-C and Swift, see Create a JWT.
Configure the iOS SDK
Before you configure the iOS SDK, you need:
- The value of the API space ID field in Dotdigital Marketing.
- A class that creates a JWT, as described in Set up authentication.
To configure the iOS SDK:
- Create a new instance of the
CMPComapiConfigclass. - Pass your API space ID to
setApiSpaceID. - Pass your authentication delegate to
setAuthDelegate. - If you installed the SDK with Swift Package Manager, pass your APNS environment to
setApnsEnvironment. See Set up the APNS environment.
// Create a config object with your API space ID and an object that conforms to
// the CMPAuthenticationDelegate protocol.
CMPComapiConfig *config = [[[CMPComapiConfig alloc] init]
    setApiSpaceID:@"<API_SPACE_ID>"];
[config setAuthDelegate:self];
let config = ComapiConfig()
.setApiSpaceID("<API_SPACE_ID>")
.setAuthDelegate(self)
.setApnsEnvironment("production")
You do not normally need a custom API configuration
CMPComapiConfigalso has asetApiConfigmethod, which takes aCMPAPIConfigurationobject. You create that object with a scheme, a host, and a port. Use it only when you must direct the SDK at a non-default endpoint. Most apps do not set it.
Setting the log level
Use setLogLevel to control how much the SDK logs. The available levels are CMPLogLevelVerbose, CMPLogLevelDebug, CMPLogLevelInfo, CMPLogLevelWarning, and CMPLogLevelError. In Swift, these are LogLevel.verbose, .debug, .info, .warning, and .error.
#if DEBUG
let logLevel = LogLevel.debug
#else
let logLevel = LogLevel.warning
#endif

let config = ComapiConfig()
    .setApiSpaceID("<API_SPACE_ID>")
    .setAuthDelegate(self)
    .setLogLevel(logLevel)
To retrieve the SDK's internal file logs, call getFileLogs() on the client.
Privacy noteVerbose and debug logs can include request and response detail. Do not ship a release build at a level below
warning.
Initialise the SDK and retrieve the client
Initialise the SDK once, early in your app lifecycle. Retrieve the client as a separate object, or as a singleton.
Both initialisation methods return nil if an error occurs, so always check the result before you use it.
To retrieve the client as a separate object that you store yourself:
CMPComapiClient *client = [CMPComapi initialiseWithConfig:config];
// The client instance is ready to use.
let client = Comapi.initialise(with: config)
// The client instance is ready to use.To retrieve the client as a singleton:
[CMPComapi initialiseSharedInstanceWithConfig:config];

CMPComapiClient *client = [CMPComapi shared];
// The shared client is ready to use.
let client = Comapi.initialiseSharedInstance(with: config)
// The shared client is ready to use.Sessions
Starting a session
The SDK requires an active session to receive push messages and to register push tokens.
After the SDK creates a session, it renews the session automatically when the session expires. The SDK renews the session until you end it explicitly. It is safe to call the start method more than once, because the SDK starts a new session only when it needs to.
To create a session, you need two things. You need a client that initialised successfully. You also need to identify the app user, so that the SDK can populate the sub claim in the JWT when it requests a token.
[client.services.session startSessionWithCompletion:^{
    // Session created successfully.
} failure:^(NSError * _Nullable error) {
    // An error occurred.
    NSLog(@"Failed to start session: %@", error.localizedDescription);
}];
client.services.session.startSession(completion: {
// Session created successfully.
}, failure: { error in
// An error occurred.
print("Failed to start session: \(String(describing: error))")
})Ending a session
End a session only when you want to stop the app receiving push notifications, or when you want to change users on the app.
[client.services.session endSessionWithCompletion:^(CMPResult<NSNumber *> *result) {
    if (result.error) {
        // An error occurred.
    } else if ([result.object boolValue]) {
        // Session ended successfully.
    }
}];
client.services.session.endSession(completion: { result in
if let error = result.error {
// An error occurred.
print("Failed to end session: \(error)")
} else if result.object?.boolValue == true {
// Session ended successfully.
}
})Ask users' permission and register the push token
App users must give their permission before your app can receive push notifications. After the user grants permission, you register for remote notifications, then pass the resulting device token to the SDK.
Request permission
Call requestAuthorization on UNUserNotificationCenter. Call registerForRemoteNotifications() on the main thread only after the user grants permission.
#import <UserNotifications/UserNotifications.h>

- (void)requestNotificationPermission {
    UNUserNotificationCenter *center = [UNUserNotificationCenter currentNotificationCenter];
    [center requestAuthorizationWithOptions:(UNAuthorizationOptionAlert |
                                             UNAuthorizationOptionSound |
                                             UNAuthorizationOptionBadge)
                          completionHandler:^(BOOL granted, NSError * _Nullable error) {
        if (!granted) {
            // The user declined. Do not register for remote notifications.
            return;
        }
        dispatch_async(dispatch_get_main_queue(), ^{
            [[UIApplication sharedApplication] registerForRemoteNotifications];
        });
    }];
}
import UserNotifications
func requestNotificationPermission() {
UNUserNotificationCenter.current()
.requestAuthorization(options: [.alert, .sound, .badge]) { granted, error in
guard granted else {
// The user declined. Do not register for remote notifications.
return
}
DispatchQueue.main.async {
UIApplication.shared.registerForRemoteNotifications()
}
}
}For more information, see Apple's guidance on asking permission to use notifications.
Pass the device token to the SDK
The system calls application(_:didRegisterForRemoteNotificationsWithDeviceToken:) when registration succeeds. Convert the token to a hexadecimal string, then pass it to the setPushToken method on the client.
Device token string formattingYou cannot cast the
deviceTokendata directly to a string, because this corrupts the token. You must convert the bytes to a hexadecimal string. The code below shows how to do this.A correct APNS token is a 64 character hexadecimal string, and looks like this:
02df25c845d460bcdad7802d2af6fc1dfce97283bf75cc993eb6dca835ea2e2fIf your token contains any character outside
0-9anda-f, or if it is not 64 characters long, the conversion is wrong.
- (void)application:(UIApplication *)application didRegisterForRemoteNotificationsWithDeviceToken:(NSData *)deviceToken {
    NSMutableString *token = [NSMutableString stringWithCapacity:deviceToken.length * 2];

    // Convert the deviceToken bytes to a hexadecimal string. Use unsigned char,
    // because a signed char sign-extends any byte above 0x7F and corrupts the token.
    const unsigned char *bytes = (const unsigned char *)deviceToken.bytes;
    for (NSUInteger i = 0; i < deviceToken.length; i++) {
        [token appendFormat:@"%02x", bytes[i]];
    }

    // Pass the hexadecimal string version of the token to the SDK.
    if (token.length > 0) {
        CMPComapiClient *client = [CMPComapi shared];
        if (client) {
            [client setPushToken:token completion:^(BOOL success, NSError *error) {
                if (error || !success) {
                    NSLog(@"Failed to register APNS token: %@", error.localizedDescription);
                } else {
                    // APNS token registered successfully.
                }
            }];
        }
    }

    // The rest of your push notification code.
}

- (void)application:(UIApplication *)application didFailToRegisterForRemoteNotificationsWithError:(NSError *)error {
    // Registration failed. This is common on the iOS Simulator and when the
    // device has no network connection. There is no token for this session,
    // so log the error and do not retry in a loop.
    NSLog(@"Failed to register for remote notifications: %@", error.localizedDescription);
}
func application(_ application: UIApplication,
didRegisterForRemoteNotificationsWithDeviceToken deviceToken: Data) {
let token = deviceToken.map { String(format: "%02x", $0) }.joined()
client?.set(pushToken: token, completion: { success, error in
if let error = error {
print("Failed to register APNS token: \(error)")
} else if success {
// APNS token registered successfully.
}
})
}
func application(_ application: UIApplication,
didFailToRegisterForRemoteNotificationsWithError error: Error) {
// Registration failed. This is common on the iOS Simulator and when the
// device has no network connection. There is no token for this session,
// so log the error and do not retry in a loop.
print("Failed to register for remote notifications: \(error)")
}
Only users that have both an email address and a push token are created in Dotdigital MarketingRead the Register your app users for push page to understand the requirements for syncing your app users with Dotdigital Marketing. Dotdigital Marketing syncs only the users who have both an email address and a push token. Only these users can receive push messages.
Handle push notifications in your app
The SDK does most of the work when your app receives a push notification. You must still write the code for permission, foreground display, and routing after a tap.
This diagram shows the order in which iOS calls each method, and which parts you write:
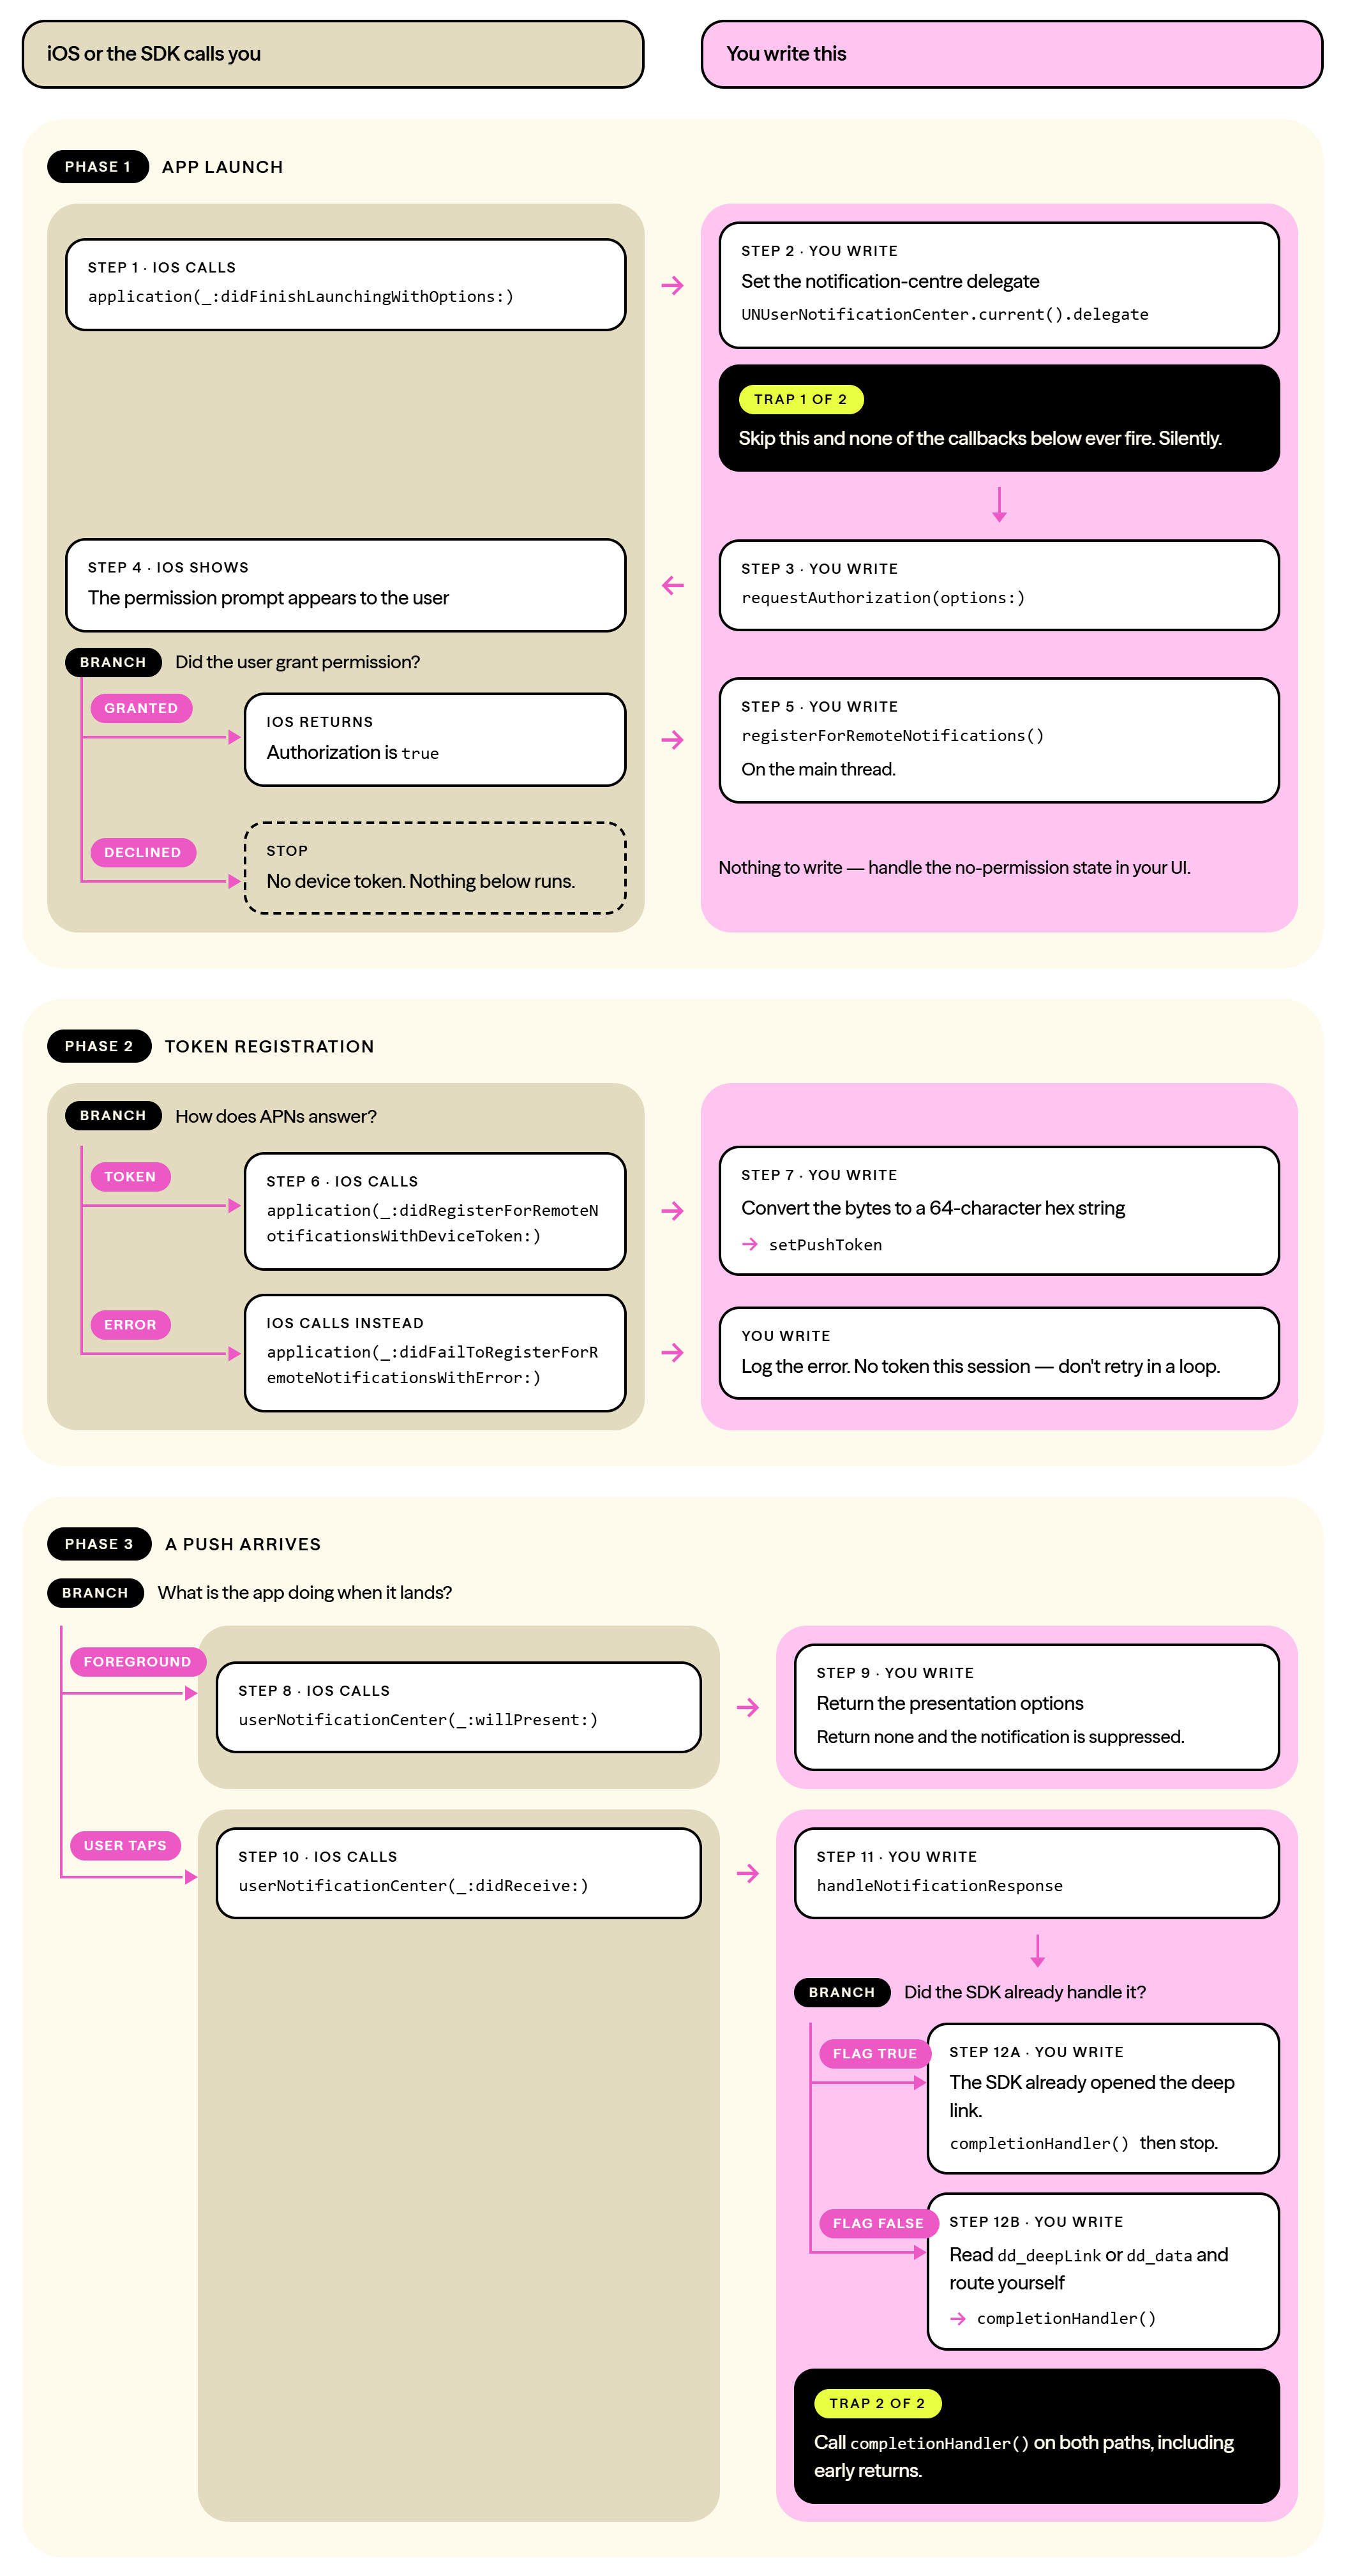
You must implement callbacks for three cases:
- Displaying a push notification while your app is in the foreground. iOS displays push notifications automatically only while your app is in the background. iOS has no standard way to display a notification while the app is in the foreground, so you must decide how to display it.
- Reading a deep link that arrives with a push message. The SDK opens the deep link for you. Implement this callback only if your app needs to know which deep link was opened. See Handling deep links.
- Receiving custom data that arrives with a push message. Apps often use this data to start a function after a push tap. See Handling custom data payloads.
Set the notification centre delegate
iOS calls your notification callbacks only if you set the UNUserNotificationCenter delegate. Set it before your app finishes launching.
- (BOOL)application:(UIApplication *)application didFinishLaunchingWithOptions:(NSDictionary *)launchOptions {
    [UNUserNotificationCenter currentNotificationCenter].delegate = self;
    return YES;
}
func application(_ application: UIApplication,
didFinishLaunchingWithOptions launchOptions: [UIApplication.LaunchOptionsKey: Any]?) -> Bool {
UNUserNotificationCenter.current().delegate = self
return true
}
No callbacks are called if you do not set the delegateIf you do not set the
UNUserNotificationCenterdelegate, iOS never calls the methods below. Your app then shows no foreground notifications, and the SDK records no push taps for analytics.
Displaying push notifications when the app is in the foreground
iOS suppresses a push notification when your app is in the foreground. To display it, implement userNotificationCenter(_:willPresent:withCompletionHandler:) and tell iOS which presentation options to use.
- (void)userNotificationCenter:(UNUserNotificationCenter *)center
       willPresentNotification:(UNNotification *)notification
         withCompletionHandler:(void (^)(UNNotificationPresentationOptions))completionHandler {

    // Let iOS display the notification banner and play a sound, even though the
    // app is in the foreground.
    if (@available(iOS 14.0, *)) {
        completionHandler(UNNotificationPresentationOptionBanner |
                          UNNotificationPresentationOptionSound |
                          UNNotificationPresentationOptionList);
    } else {
        completionHandler(UNNotificationPresentationOptionAlert |
                          UNNotificationPresentationOptionSound);
    }
}
func userNotificationCenter(_ center: UNUserNotificationCenter,
willPresent notification: UNNotification,
withCompletionHandler completionHandler: @escaping (UNNotificationPresentationOptions) -> Void) {
// Let iOS display the notification banner and play a sound, even though the
// app is in the foreground.
if #available(iOS 14.0, *) {
completionHandler([.banner, .sound, .list])
} else {
completionHandler([.alert, .sound])
}
}To build your own in-app display instead, read the alert content from the notification payload, then call the completion handler with an empty option set.
func userNotificationCenter(_ center: UNUserNotificationCenter,
                            willPresent notification: UNNotification,
                            withCompletionHandler completionHandler: @escaping (UNNotificationPresentationOptions) -> Void) {

    let content = notification.request.content
    let title = content.title
    let body = content.body

    // Display your own in-app banner with the title and body here.

    // Pass an empty option set so that iOS does not also display the notification.
    completionHandler([])
}
Reading the alert from the raw payloadThe
apsdictionary in the raw payload holds the alert. The value of thealertkey can be a string, or a dictionary that containstitleandbodykeys. Check the type before you cast it. It is simpler to readnotification.request.content.titleandnotification.request.content.body, because iOS resolves both payload forms for you.
Handling a notification tap
iOS calls userNotificationCenter(_:didReceive:withCompletionHandler:) when the user taps a notification. Pass the response to the SDK. The SDK opens any deep link, records the tap against Dotdigital Marketing analytics, and returns the payload to you.
The completion block gives you two things: a flag that tells you whether the SDK opened the deep link, and the payload. Check the flag first. If the SDK already opened the deep link, do not handle it again, or your app performs the same action twice.
Click tracking only happens for deep-link push messagesThe SDK reports the tap to Dotdigital Marketing only when the payload contains a
dd_deepLinkobject with atrackingUrlvalue. If you send a push message with custom data but no deep link, the SDK does not record the tap, even when you call this method.If you need click reporting for a push message, include a deep link in that message. See Send a deep link or custom data with a push message.
- (void)userNotificationCenter:(UNUserNotificationCenter *)center
didReceiveNotificationResponse:(UNNotificationResponse *)response
         withCompletionHandler:(void (^)(void))completionHandler {

    CMPComapiClient *client = [CMPComapi shared];
    if (!client) {
        completionHandler();
        return;
    }

    [client handleNotificationResponse:response completion:^(BOOL isDeepLinkLaunched, NSDictionary * _Nonnull data) {

        if (isDeepLinkLaunched) {
            // The SDK opened the deep link. There is nothing more to do.
            completionHandler();
            return;
        }

        if (data[@"dd_deepLink"]) {
            // The SDK did not open the link, so handle it in your app.
            NSString *url = data[@"dd_deepLink"][@"url"];
            NSLog(@"Deep link: %@", url);

        } else if (data[@"dd_data"]) {
            // Custom data from the Dotdigital Marketing push message.
            NSDictionary *ddData = data[@"dd_data"];
            NSLog(@"Custom data: %@", ddData);
        }

        completionHandler();
    }];
}
func userNotificationCenter(_ center: UNUserNotificationCenter,
didReceive response: UNNotificationResponse,
withCompletionHandler completionHandler: @escaping () -> Void) {
guard let client = client else {
completionHandler()
return
}
client.handle(notificationResponse: response, completion: { didHandleLink, data in
if didHandleLink {
// The SDK opened the deep link. There is nothing more to do.
completionHandler()
return
}
if let deepLink = data["dd_deepLink"] as? NSDictionary,
let url = deepLink["url"] as? String {
// The SDK did not open the link, so handle it in your app.
print("Deep link: \(url)")
} else if let customData = data["dd_data"] as? NSDictionary {
// Read the custom data payload.
print("Custom data: \(customData)")
}
completionHandler()
})
}
Always call the completion handlerCall
completionHandler()on every path through this method, including the paths where you return early. If you do not, iOS holds the notification open and may stop delivering later notifications to your app.
The data parameter is the complete push payloadThe SDK passes back the full, unmodified notification payload, which is the same dictionary as
response.notification.request.content.userInfo. It contains theapsdictionary, the Dotdigital Marketing keys, and any other key that you send.This means you can send any custom JSON structure you need and read it here. The SDK does not filter or reshape it, so you can build advanced push handling in your app and still deliver the data through Dotdigital Marketing.
Detecting push messages from Dotdigital Marketing
Your app can receive push messages from more than one provider or system. To detect whether Dotdigital Marketing sent a push message, call isDotdigitalOriginated with the push notification data. This is a class method on CMPComapiClient, so you do not need a client instance to call it. It returns YES in Objective-C, or true in Swift, if Dotdigital Marketing sent the message.
if ([CMPComapiClient isDotdigitalOriginated:response.notification.request.content.userInfo]) {
    // Dotdigital Marketing sent this message.
}
if ComapiClient.isDotdigitalOriginated(response.notification.request.content.userInfo) {
// Dotdigital Marketing sent this message.
}Handling deep links
You can send a deep link with a push message. When the user taps the notification, the SDK opens the deep link for you and records the tap for analytics.
Your app must be able to receive the deep link. To do this, register a custom URL scheme, a universal link, or both.
| Method | Use it when |
|---|---|
Custom URL scheme, for example myappscheme:// | You only need to open your own app. This is the simplest option to set up. |
Universal link, for example https://example.com/product/123 | You want one link to open your app when it is installed, and your website when it is not. |
A push message can also carry a plain web address. If your app does not claim that address with a universal link, iOS opens it in the browser rather than in your app. To choose what a message sends, see Send a deep link or custom data with a push message.
For Apple's guidance, see Defining a custom URL scheme for your app and Allowing apps and websites to link to your content.
Register a custom URL scheme
- In Xcode, select your app target, then open the Info tab.
- Expand URL Types, then select the + button.
- In the Identifier field, enter your app's bundle identifier, for example
com.example.yourApp. - In the URL Schemes field, enter your scheme, for example
myappscheme.
Your app now opens for any URL that starts with myappscheme://.
Add your scheme to LSApplicationQueriesSchemesBefore the SDK opens a deep link, it calls
canOpenURLto check that a handler exists. On iOS 9 and later,canOpenURLreturns false for any scheme that your app has not declared in theLSApplicationQueriesSchemesarray inInfo.plist. If the check fails, the SDK writes "Cannot open URL" to the log and your deep link does not open.Add each scheme that you send in a deep link to
LSApplicationQueriesSchemes, including your own app's scheme:<key>LSApplicationQueriesSchemes</key> <array> <string>myappscheme</string> </array>Test this on a device before you release. A missing entry fails without an error that reaches the user.
Handling the incoming URL
iOS delivers the URL to your app when the SDK opens the deep link. Where iOS delivers it depends on whether your app uses a scene delegate.
For apps that use UIWindowSceneDelegate, which is the default for apps created in Xcode 11 and later:
func scene(_ scene: UIScene, openURLContexts URLContexts: Set<UIOpenURLContext>) {
    guard let url = URLContexts.first?.url else { return }
    route(to: url)
}

// Called when your app launches from a cold start through a deep link.
func scene(_ scene: UIScene,
           willConnectTo session: UISceneSession,
           options connectionOptions: UIScene.ConnectionOptions) {
    if let url = connectionOptions.urlContexts.first?.url {
        route(to: url)
    }
}

private func route(to url: URL) {
    // Inspect the host and path, then navigate to the correct screen in your app.
    // For myappscheme://product/123, url.host is "product" and url.path is "/123".
}
For apps that do not use a scene delegate:
func application(_ app: UIApplication,
                 open url: URL,
                 options: [UIApplication.OpenURLOptionsKey: Any] = [:]) -> Bool {
    route(to: url)
    return true
}
- (BOOL)application:(UIApplication *)app
openURL:(NSURL *)url
options:(NSDictionary<UIApplicationOpenURLOptionsKey, id> *)options {
[self routeToURL:url];
return YES;
}For universal links, implement the continue-user-activity method instead:
func application(_ application: UIApplication,
                 continue userActivity: NSUserActivity,
                 restorationHandler: @escaping ([UIUserActivityRestoring]?) -> Void) -> Bool {
    guard userActivity.activityType == NSUserActivityTypeBrowsingWeb,
          let url = userActivity.webpageURL else {
        return false
    }
    route(to: url)
    return true
}
Extracting the deep link without launching it
You may want to read the deep-link URL yourself instead of letting the SDK open it. Read the dd_deepLink dictionary from the data that handleNotificationResponse returns, and check the deep-link flag first. See Handling a notification tap.
The dd_deepLink object contains a url key, and a trackingUrl key that the SDK uses for click reporting:
{
  "dd_deepLink": {
    "url": "myappscheme://product/123",
    "trackingUrl": "https://<tracking endpoint supplied by Dotdigital Marketing>"
  }
}
Deep link trackingThe SDK records the push tap against Dotdigital Marketing analytics when you pass the notification response to
handleNotificationResponse. If you never call this method, your push reporting in Dotdigital Marketing does not show the tap.
Handling custom data payloads
You can send custom JSON data with a push message. Dotdigital Marketing delivers the data to your app, and your app decides what to do with it. Use this to build advanced push handling while you still send the message through Dotdigital Marketing.
The SDK does not interpret your custom data, and it does not change the structure. Your app receives exactly what you sent.
The custom data arrives in the dd_data object:
{
  "dd_data": {
    "productId": "123",
    "campaign": "summer-sale",
    "screen": "product-detail"
  }
}
Read dd_data from the payload that handleNotificationResponse returns. See Handling a notification tap.
What you can build with custom data
Because the SDK returns the whole payload untouched, your app can act on any structure you choose. For example:
- Route the user to a specific screen, using your own routing logic instead of a URL scheme.
- Refresh or invalidate cached data before you show a screen.
- Set a badge count or an in-app state flag.
- Choose between several in-app actions, based on a value in the payload.
Your app is responsible for validating this data. Treat every value as untrusted input. Check that each key exists and has the type you expect before you use it, because a malformed or unexpected payload must not crash your app.
Detecting Dotdigital Marketing messages in a mixed payloadDotdigital Marketing adds a
dd_originatedkey to its push messages. TheisDotdigitalOriginatedmethod reads this key. If your app receives push messages from more than one system, check this first, then read your custom data. See Detecting push messages from Dotdigital Marketing.
To find out how to send custom data, and what you can put in it, see Send a deep link or custom data with a push message.
Silent pushes
A silent push delivers custom JSON data to your app without notifying the user. Use a silent push to start an action in your app in the background.
When you send a silent push, Dotdigital Marketing sets content-available to 1 in the aps dictionary, and omits the alert, badge, sound, and category values. It sends the message with a push type of background and a priority of 5. This is what Apple requires for a background update, so iOS delivers the message to your app without displaying anything.
To receive silent pushes:
-
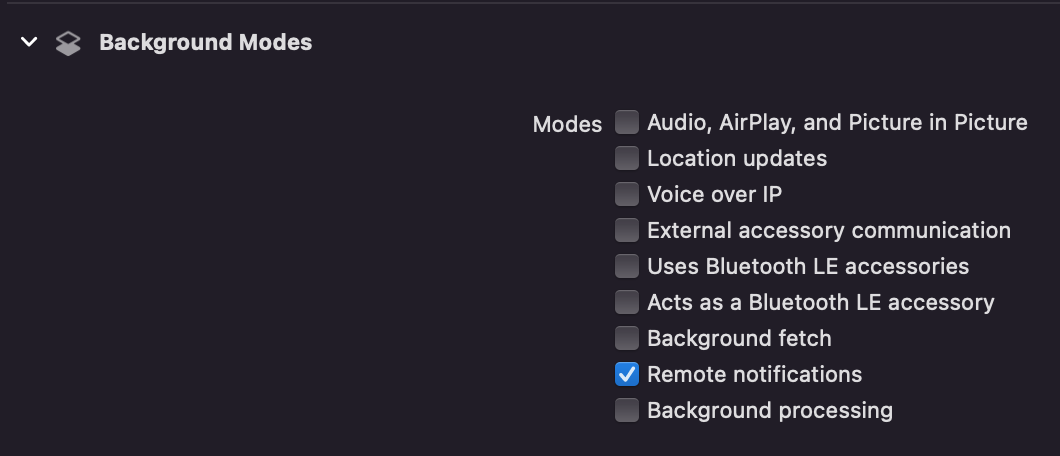
Enable the Remote notifications background mode. In Xcode, select your app target, go to Signing & Capabilities, add the Background Modes capability, then select Remote notifications.
-
Implement the
didReceiveRemoteNotificationcallback. The custom data arrives in thedd_datadictionary.
- (void)application:(UIApplication *)application
didReceiveRemoteNotification:(NSDictionary *)userInfo
fetchCompletionHandler:(void (^)(UIBackgroundFetchResult))completionHandler {

    NSDictionary *ddData = userInfo[@"dd_data"];
    if (ddData) {
        // Process the custom data here.
    }

    completionHandler(UIBackgroundFetchResultNewData);
}
func application(_ application: UIApplication,
didReceiveRemoteNotification userInfo: [AnyHashable: Any],
fetchCompletionHandler completionHandler: @escaping (UIBackgroundFetchResult) -> Void) {
if let ddData = userInfo["dd_data"] as? [String: Any] {
// Process the custom data here.
}
completionHandler(.newData)
}
iOS does not guarantee silent push deliveryiOS treats silent pushes as low priority. The system may delay them, or it may not deliver them at all, depending on battery level, network conditions, and how often the user opens your app. Do not rely on a silent push for anything critical.
For more information, see Apple's guidance on pushing background updates to your app.
To find out how to send a silent push, see Send a silent push message.
Next stepsMake sure that your app passes an email address to the SDK for the app user. Dotdigital Marketing then creates a contact for that user. To do this, follow these instructions.
When your app can receive push messages, decide what each message does. See Send a deep link or custom data with a push message.
Updated 27 days ago