
Create a push notification profile
A push notification profile tells Dotdigital Marketing how to communicate with your app through Apple's APNS and Google's FCM push systems. It also tells Dotdigital Marketing how to authorise a user for push.
You can have only one profile. One profile can send push notifications to both Android and iOS devices.
To set up your push notification profile:
-
Log in to Dotdigital Marketing.
-
Go to Connect > Digital marketing channels.
-
Select Push Notification, then select New profile.
-
On the New profile page, enter the name of your app.
-
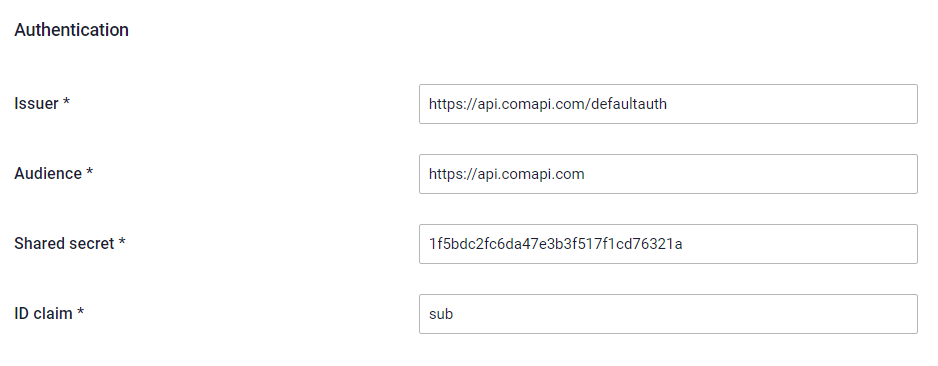
In the Authentication section, the values are pre-populated for you. Make a note of the value of each field. You use these values to create a JSON Web Token (JWT) in your app. Your app passes that token to our SDK to authorise the user for push.
 Ensure your JWT details are correct
The signed JWT that your app passes to identify an app user must:
- Have an
issclaim with the Issuer value - Have an
audclaim with the Audience value - Have a unique identifier for the app user in the claim named by the ID claim value, which is the
subclaim in this example - Be signed with the HS256 algorithm, and use the string secret from the Shared secret field
If you have problems, use JWT.io to check and validate your JWTs.
For the settings in the screenshot above, the JWT payload looks like this:
{
  "sub": "[email protected]",
  "nonce": "3d7777d0-ecb1-4154-bee8-8faf66a0d69e",
  "aud": "https://api.comapi.com",
  "iss": "https://api.comapi.com/defaultauth",
  "iat": 1700225895,
  "exp": 1700297896
}
The signed JWT looks like this:
eyJhbGciOiJIUzI1NiIsInR5cCI6IkpXVCJ9.eyJzdWIiOiJmcmVkLnNtaXRoQGVtYWlsc29tLmlvIiwibm9uY2UiOiIzZDc3NzdkMC1lY2IxLTQxNTQtYmVlOC04ZmFmNjZhMGQ2OWUiLCJhdWQiOiJodHRwczovL2FwaS5jb21hcGkuY29tIiwiaXNzIjoiaHR0cHM6Ly9hcGkuY29tYXBpLmNvbS9kZWZhdWx0YXV0aCIsImlhdCI6MTcwMDIyNTg5NSwiZXhwIjoxNzAwMjk3ODk2fQ.icXPEI8jvtFaey1Fl3afBQgp3mvHYsPj02n0WS1njv4 - Have an
-
Configure your app's push systems. Use the section that applies to the operating systems that you built your app for: enter your FCM credentials, enter your APNS credentials, or both.
-
Expand the Status drop-down menu and select Enabled.
-
Select SAVE.
Dotdigital Marketing puts a value in the API space ID field. You need this value to initialise an SDK, so make a note of it for your development team.
Enter your FCM credentials in Dotdigital Marketing
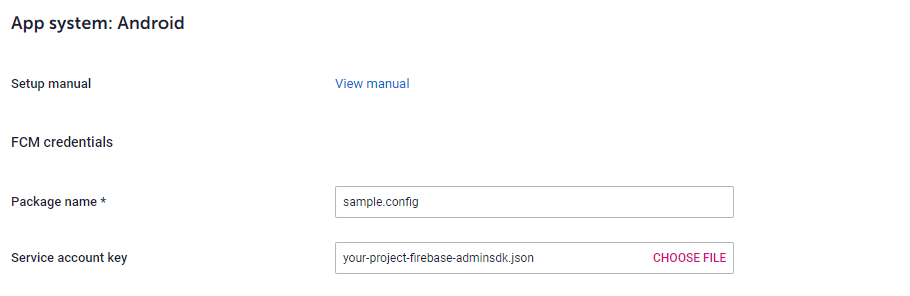
Our Android SDK uses Firebase Cloud Messaging (FCM) to send push notifications to your Android app users. You must give us some details about your Firebase project.
Open the Firebase console. If you do not have a Firebase project, create one.
-
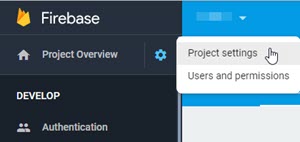
In the Firebase console, select the cog icon and go to Project settings.
-
In the General tab, copy your package name.
-
In Dotdigital Marketing, under the heading App system: Android, enter your package name.
-
Generate a private key and an FCM JSON file. Follow these instructions.
-
For Service account key, select Add file and upload your FCM JSON file.
-
Select Save.
Enter your APNS credentials in Dotdigital Marketing
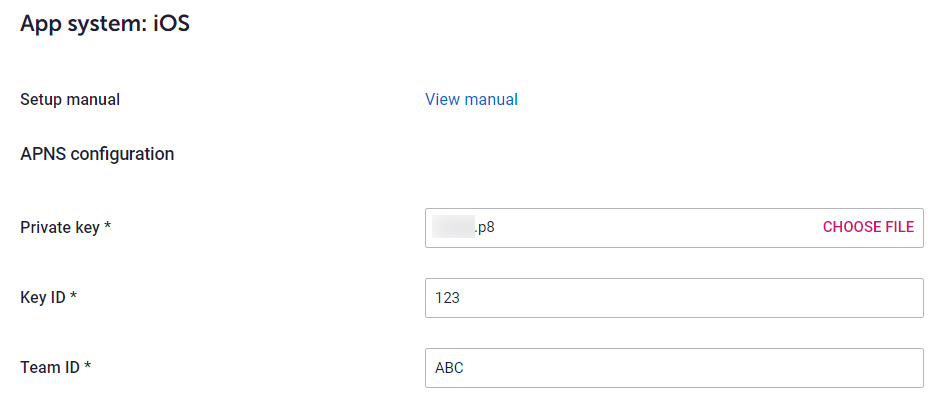
Our iOS SDK uses the Apple Push Notification Service (APNS) to send push notifications to your contacts. You must configure your APNS token details so that we can send push messages to your app.
Dotdigital Marketing uses APNS tokens, not APNS certificates. APNS certificates expire every year. APNS tokens do not expire. For Apple's instructions on how to create an APNS token, see Establishing a token-based connection to APNs.
Open your Apple Developer Portal. If you do not have an app ID with the Push Notifications service enabled, create one.
In your Apple Developer Portal:
- Go to Certificates, IDs & Profiles.
- Select Keys > All, then select the + button to create a new key.
- Enter a name for the key. Make sure that the Apple Push Notifications service (APNs) option is selected, then select Create key.
- Download the key (.p8 file) and store it securely. Copy the Key ID.
In Dotdigital Marketing, under the heading App system: iOS:
- For Private key, select Choose file and upload your APNS key file (.p8).
- For Key ID, enter the value of your APNS key's ID.
- For Team ID, enter the value of your team ID.
- Select Save.
Find your API space ID
You use the API space ID to initialise our mobile SDKs.
This ID is displayed at the bottom of your push notification profile page.
Updated 27 days ago